Showing posts with label tools for web developers. Show all posts

Friday, 13 September 2013

The Best Tools to Easily Perform Remote Tech Support

computer-phone-frustration

“Help, my computer is broken!” comes the phone call yet again. If you’re stuck playing tech support for family or friends, there are many free tools that allow you to remotely access the other person’s computer and fix it.

There are a million and one remote tech support options out there. We’ll look at the best ones here, whether you need to walk them through downloading one over the phone or want to set up remote access ahead of time.

TeamViewer

TeamViewer is the remote support tool of choice for many geeks. It can be used in several different ways. You can direct your partner to download the TeamViewer QuickSupport application, which can run without administrator access or any system configuration. It will give them a session ID and password that they can give to you, allowing you to easily remotely connect from your TeamViewer program. There’s no setup process here — just download the appropriate program and double-click it to launch it.


You could also opt to set up unattended access after installing the full TeamViewer client, giving you permanent remote access to the computer without the remote user having to give you any passwords or confirm anything. As long as their computer is on, you’ll be able to access it remotely. If you want to do preventative maintenance or fix their computer while they’re not around, this is a convenient option.


TeamViewer is also cross-platform, so you can use it to troubleshoot a Mac or troubleshoot your parents’ Windows computer from your Linux PC. You can even remotely connect from an Android or iOS device. We’ve taken an in-depth look at TeamViewer in the past.

Windows Remote Assistance

Windows has a built-in remote assistance feature designed for just this situation. While only Professional editions of Windows can use the remote desktop server software, every version of Windows can send a remote assistance invitation and invite someone else to assist with their computers. This can be a convenient option because it’s already installed on the remote Windows computer, so you don’t have to walk the person through installing anything.

To use this feature, tell the other person to launch Windows Remote Assistance — either by opening the Start menu, typing Windows Remote, and pressing Enter or navigating to Start -> All Programs -> Maintenance -> Windows Remote Assistance.

They’ll need to use the Invite someone you trust to help you option and then select Easy Connect, which will give them a password.

Note that Easy Connect won’t always be available — if it isn’t, the remote user will have to create an invitation file using the Windows Remote Assistance app and send it to you.


You’ll need to open the Windows Remote Assistance application on your computer, choose Help someone who has invited you, select Easy Connect, and enter the password. If Easy Connect isn’t available, you’ll have to provide the invitation file.

After they approve your connection, you’ll be able to see and control their desktop remotely so you can begin cleaning it of viruses, removing toolbars, or dealing with whatever other problems are there. Read our in-depth walkthrough to Windows Remote Assistance for more information.


Windows Remote Assistance can help in a pinch, but it’s not the ideal permanent solution. If you find yourself needing to connect regularly, there’s no way to connect without having the other person open the Remote Assistance app and tell you the password. If a solution that allows you to remotely log in without pestering the other person is ideal, set up TeamViewer or a similar program instead.

Chrome Remote Desktop

There’s a good chance both you and your recipient already have Google’s Chrome browser installed on your computers. If you do, you can use Chrome Remote Desktop app to connect to them remotely.
To do this, both you and the other person will need to have the Chrome Remote Desktop app installed. The other person will need to open the Chrome Remote Desktop app from their new tab page and click Enable remote connections.

They’ll then need to click the Share button to share their computer with someone, which will give them an access code.

Once they provide you with the access code, you’ll be able to open the Chrome Remote Desktop app, click the Access button, and enter the access code. You’ll then be connected to their computer.


You could also try setting up a PIN for permanent remote access. Like TeamViewer, this tool is cross-platform and also works on Mac, Linux, and Chrome OS. It will also likely be more robust than Windows Remote Assistance, as it shouldn’t fail — unlike the Easy Connect option in Windows Remote Assistance.
We’ve previously covered using Google Chrome to remotely access your computers.

More Options

Sure, there are more options, but they’re not all ideal. Skype has a screen-sharing feature, which is convenient because so many people have Skype installed — but Skype’s screen sharing feature doesn’t allow you to control the PC remotely, so you’d have to walk the person through clicking on the correct things.

LogMeIn is another remote desktop solution that’s occasionally used, but it’s much more focused on paid solutions for businesses. TeamViewer seems to be a better option for the average geek.
You could try enabling Remote Desktop in Windows for permanent remote access, but that would require the other person have a Professional version of Windows or better — not too common with average users. This would also require port forwarding to make the machine accessible from the Internet.


You could also set up a VNC server, which is the manual way of doing this. A VNC server is essentially a free alternative to Windows Remote Desktop, so you could install it on any edition of Windows. However, VNC servers are just a server — you have to manually forward ports and ensure it’s remotely accessible yourself. This is much more painful than just using one of the above solutions, which handles the connection setup itself without any messy port-forwarding.

Ultimately, you’re probably better off with TeamViewer. It’s easy to use, whether you’re trying to get the other person to download the QuickSupport application — no administrator access needed — and give you a password or configure remote, unattended access so you can always access their PC. The remote assistance features built into Windows and Chrome could also be useful as they should be quick to set up if you’re already using Windows or Chrome.

If you constantly find yourself having to perform remote tech support for the same people, you may want to get your relatives off of Windows entirely. Consider giving them a Mac, Chromebook, Linux PC, iPad, Android tablet — anything that’s more difficult to mess up than a good old-fashioned Windows desktop.

Friday, 25 January 2013

Branching and Merging with TortoiseSVN || Merge Branch with Trunk || Delete a Branch ||


Overview

The discussion below assumes that you have a Subversion repository that uses the standard trunk/branches/tags structure. In other words, a repository at http://site.com/project with trunk, branches, and tags subdirectories.

I’ll also assume that you have already checked out a local working copy of trunk, and that you’ve already created an Eclipse project using this working copy.

When you want to work on a new branch you’ll follow these general steps using Subclipse, which are described in more detail below:
1-Create a new branch and switch to it
2-Develop in your branch, periodically merging the latest changes from trunk into your branch
3-When your development is complete, merge changes from your branch back into trunk
4-Delete your branch

Switch

Your local working copy reflects some directory in the remote Subversion repository. If you initially checkout trunk, then your working copy reflects trunk. If you initially checkout a branch, it reflects that branch. Using the svn switch command you can have Subversion modify your working copy to reflect another directory in the repository. Switching may not sound that exciting but it’s key to branching and merging, as you’ll soon see.

First off, ensure that your working copy has no local changes. Either commit your changes or revert them.

Next, right-click your project in Eclipse’s Project Explorer, select the Team submenu, and click the Switch to another Branch/Tag/Revision… item. All of Subclipse’s actions are in this Team menu, so from now on I’ll refer to specific actions like Team > Switch to another Branch/Tag/Revision.

In the To URL field, you specify the URL of the repository directory you want to switch your local working copy to. If your working copy initially reflects http://site.com/project/trunk, you could specify a branch as http://site.com/project/branches/somebranch. Generally you’ll want to leave all of the other options in this dialog box as they are.

Create a new Branch

Creating a new branch is almost trivial. First, switch your local copy to trunk (if it’s not already trunk). And again, make sure you have no local changes.

Next select Team > Branch/Tag… and specify http://site.com/project/branches/yourbranch in the Copy to URL field. This will create a branch named yourbranch.

Click Next and leave HEAD revision selected. Click Next again, enter a commit message like “Created the yourbranch branch”, check the “Switch working copy to new branch/tag” checkbox, and click Finish.

That’s it! You’ve created your new branch in the repository and switched your working copy to it. Now you can implement your major new features in your branch and commit them to subversion without affecting trunk.

This is assuming you have your code checked in to the trunk directory and have a standard SVN structure of trunk, branches and tags. There are a number of developers who prefer to develop solely in a branch and never touch the trunk, but the process is generally the same and you may be on a small team and prefer to work in the trunk and branch occasionally.

There are three steps to successful branching. First you branch, then when you are ready you need to reintegrate any changes that other developers may have made to the trunk in to your branch. Then finally when your branch and the trunk are in sync, you merge it back in to the trunk.


1 -Right click project root in Windows Explorer > TortoiseSVN > Branch/Tag


2 -Enter the branch label in the ‘To URL’ box. For example /branches/1.1


3 -Choose Head revision
 4-Check Switch working copy
5-Click OK
6 -Make any changes to branch


 7- Make any changes to trunk

8 - Commit any changes


For this example I copied the project to another location prior to branching and made changes to that using Notepad++. Then committed it to SVN, as this directory is mapped to the trunk, that is what gets updated.


Merge Trunk into a Branch

While you’re working on your branch, you should periodically merge the latest version of trunk into your branch to make sure you’re not straying too far away.  Eventually, you’ll also need to do this as the last step before merging your branch back into trunk, to ensure you won’t cause any conflicts with trunk.

First you’ll need to switch your working copy to your branch, if necessary.  Subversion will merge the changes from trunk into your working copy, and then you’ll commit your working copy to your branch to fully integrate the changes from trunk.  So it’s vital that you start with your working copy as a mirror of your branch.  And again, ensure you have no local changes.


1- Right click project root in Windows Explorer > TortoiseSVN > Merge


2 - Choose ‘Merge a range of revisions’


3- In ‘URL to merge from’ choose your trunk


4- Click Next, then the ‘test merge’ button. This will highlight any conflicts. Here we have one conflict we will need to resolve because we made a change and checked in to trunk earlier


5- Click merge. Now we have the opportunity to edit that conflict


6-This will open up TortoiseMerge which will allow us to resolve the issue. In this case I want both changes.


7- Perform an Update then Commit


8- Reloading in Visual Studio shows we have all changes that have been made to both trunk and branch.


Merge Branch with Trunk


When you’ve finished development in your branch, you need to merge your branch changes back into trunk, so everyone else can share in the glory of your awesome new feature.  This is usually where developers turn pale and run away, but fear not; Subclipse will guide you through.

Make sure you only perform this merge when you are completely finished with your branch!  After merging your branch into trunk, you will no longer be able to use your branch.  In fact, you should delete your branch after merging it into trunk (see next section).

First, merge trunk into your branch and commit any changes to your branch, as described in the previous section.  We need to make sure your branch is consistent with trunk before merging it back.

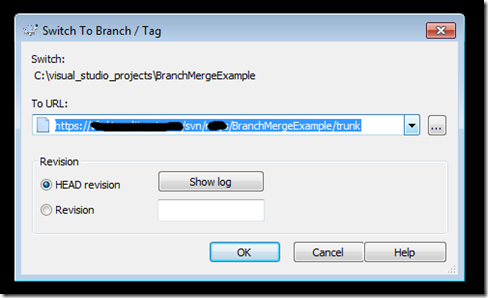
Next, switch your working copy to trunk.  Remember that Subversion merges changes into your working copy first, and then you commit them back to the repository.  So Subversion will apply your branch changes to your working copy of trunk, and then you commit those changes to trunk.

1-Switch working copy by right clicking project root in Windows Explorer > TortoiseSVN > switch


2- Switch to the trunk then ok


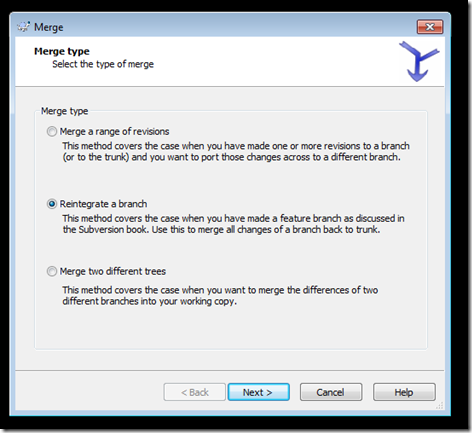
3- Right click project root in Windows Explorer > TortoiseSVN > merge


4- Choose ‘Reintegrate a branch’


5- In ‘From URL’ choose your branch then next


Click ‘Test merge’, this shouldn’t show any conflicts


Click Merge
Perform Update then Commit


Open project in Visual Studio, we now have all changes.

So there we have it we are connected back to the trunk and have all the updates merged.


Delete a Branch

As previously mentioned, after merging a branch into trunk, the branch can no longer be used.  Subversion keeps track of merges using the svn:mergeinfo property.  Because of the way it uses this property, once a branch is merged into trunk it can no longer be involved in merges properly.  For the full story, please consult the last few paragraphs of this section on branching and merging.

Subclipse does not provide a way to delete an entire branch, so you’ll need to just run this command manually:

svn delete http://site.com/project/branches/yourbranch -m "Removing completed branch"

Saturday, 15 December 2012

Mistakes to Avoid as a Web Developer


For all web developers, it is extremely important to give the best service they possibly can in order to make sure things are done correctly. However, it sometimes becomes an often occurrence that developers will make the same mistakes and that could send the whole project off course and force you to take longer than needed. This off course means more money being spent and time being lost that could be used on other stages.


Certain mistakes are common for developers, whether they are freelance or working for a firm. Avoiding these mistakes can help save you, your company and your client time and money no matter which capacity you’re working in. Here are a few tips to avoid mistakes in order to be successful and increase your reputation in the web developing world.

Keep the Lines of Communication Open

One of the main problems that many developers experience is the inability to communicate with clients or the “higher-ups” in order to come together on wants and needs when planning the web development. Clients and firms don’t always have a full understanding on what you as a developer are capable of and what you can use. Help make things easier and clearer for the clients and yourself by giving an idea of what can be done and let them fill out the remaining information in order to make things go smoothly.

Understand the Size of Project

Research is such an important part of developing in terms of understanding exactly what you will need in order to complete any project you’re about to work on. This is the time to learn and inform clients or firms of budget, timeline and any other needs that you will have to have to complete the project with no problems. Giving the clients and firms a better idea will also keep them from having you make the next mistake.

It’s a Marathon, Not a Sprint

Clients and firms, of course, would love to have all of their projects done fast, but that could come at the expense of having everything done right. Do not allow the clients or firms to rush you through any stage of the project whether it is planning or the actual developing so that you can make sure everything is in working order when you’re done with the project. This is where coming up with a pre-planned strike and numbers (budget, time) comes in complete handy because those that are expecting your projects won’t apply unrealistic numbers on you.

Know your Role

As a web developer, it is crucial that you understand that you are exactly that; a web developer. You are not a project manager, nor do you hold any other position. Your job is to develop and taking on any other responsibilities past that could result in you losing track of what you’re main objective is, causing a problem with your time and budget constraints.

Test, Test, Test

One of the biggest mistakes is for web developers to push the project without running multiple tests on multiple platforms and doing so alone. Different browsers, PCs, Mac computers, mobile; these are all different platforms to test on and enlisting some help will speed up the process and have a multiple set of eyes on everything just in case you miss something.
Be sure to use these tips when starting any project to avoid delays and make sure these mistakes don’t creep up on you.

Wednesday, 26 September 2012

10 Handy CSS Generators and Tools to Create CSS Effects

Cool effects and amazing responsiveness in the websites are some silent features of CSS3, with the help of CSS3 rules and tags, now, web designers are capable to create more rich websites. CSS generators are very useful tools which are used to convert any graphical interface into CSS rules. This means a lot to the web designers, these tools save your precious time to create styling rules for your web designs. Plus you will get more accurate and less errors within these generated CSS codes. Without using these tools, it’s nearly impossible to achieve heavy effects which are only possible into graphic editors like Photoshop & Illustrators. So, we have collected 10 most useful and handy CSS generators which will handle your burden of CSS styling and will generate cool effects of CSS3.

3D CSS Text Generator


CSS3 Sandbox


Ceaser


CSS3 Generator


Text Shadow Generator


Variable Grid System


CSS Button Generator


Ultimate CSS Gradient Generator


Typetester


CSS3 Generator