Microsoft Windows Azure offers several choices for data storage. These
include Windows Azure storage and SQL Azure. You may choose to use one
or both in your particular project. Windows Azure storage currently
contains three types of storage structures: tables, queues or blobs
(which can optionally be virtual machines).
SQL Azure is a
relational data storage service in the cloud. Some of the benefits of
this offering are the ability to use a familiar relational development
model that includes most of the standard SQL Server language (T-SQL),
tools and utilities. Of course, working with well-understood relational
structures in the cloud, such as tables, views and stored procedures
also results in increased developer productivity when working in this
new platform type. Other benefits include a reduced need for physical
database administration tasks to server setup, maintenance and security
as well as built-in support for reliability, high availability and
scalability.
Getting Started with SQL Azure
To
start working with SQL Azure, you’ll first need to set up an account.
If you are a MSDN subscriber, then you can use up to three SQL Azure
databases (maximum size 1 GB each) for up to 16 months (
details)
at as a developer sandbox. You may prefer to sign up for a regular SQL
Azure account (storage and data transfer fees apply), to do so go
here. Yet another option is to get a trial 30-day account (no credit card required). To do the latter, go
here and use signup code -
DPEWR02.
After
you’ve signed up for your SQL Azure account, the simplest way to
initially access it is via the web portal at windows.azure.com. You must
first sign in with the Windows Live ID that you’ve associated to your
Windows Azure account. After you sign in, you can create your server
installation and get started developing your application. The number of
servers and / or databases you are allowed to create will be dependent
on the type of account you’ve signed up for.
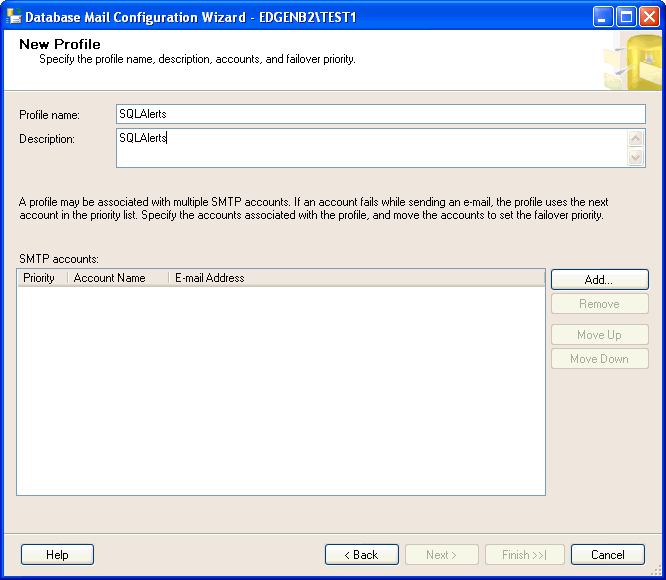
An example of the
SQL Azure web management portal is shown in Figure 1. Here you can see a
server and its associated databases. You’ll note that there is also a
tab on this portal for managing the Firewall Settings for this
particular SQL Azure installation.
 Figure 1 Summary Information for a SQL Azure Server
As
you initially create your SQL Azure server installation, it will be
assigned a random string for the server name. You’ll generally also set
the administrator username, password, geographic server location and
firewall rules at the time of server creation. You can select the
physical (data center) location for your SQL Azure installation at the
time of server creation. You will be presented with a list of locations
to choose from. As of this writing, Microsoft has 6 physical data
centers, located world-wide to select from. If your application
front-end is built in Windows Azure, you have the option to locate both
that installation and your SQL Azure installation in the same geographic
location by associating the two installations together by using an
Affinity Group.
By default there is no client access to your
newly-created server, so you’ll first have to create firewall rules for
all client IPs. SQL Azure uses port 1433, so make sure that that port is
open for your client application as well. When connecting to SQL Azure
you’ll use the
username@servername format for your username. SQL
Azure supports SQL Authentication only; Windows authentication is not
supported. Multiple Active Result Set (MARS) connections are supported.
Open
connections will ‘time out’ after 30 minutes of inactivity. Also
connections can be dropped for long-running queries or transactions or
excessive resource usage. Development best practices in your
applications around connections are to open, use and then close those
connections manually, to include retry connection logic for dropped
connections and to avoid caching connections because of these behaviors.
Another best practice is to encrypt your connection string to prevent
man-in-the-middle attacks. For best practices and code samples for SQL
Azure connections (including a suggested library which includes
patterned connection retry logic), see this TechNET
blog post.
You
will be connected to the master database by if you don’t specify a
database name in the connection string. In SQL Azure the T-SQL statement
USE is not supported for
changing databases, so you will
generally specify the database you want to connect to in the connection
string (assuming you want to connect to a database other than master).
Figure 2 below, shows an example of an ADO.NET connection:
 Figure 2 Format for SQL Azure connection string
Setting up Databases
After
you’ve successfully created and connected to your SQL Azure server,
then you’ll usually want to create one or more databases. Although you
can create databases using the SQL Azure portal, you may prefer to do so
using some of the other tools, such as SQL Server Management Studio
2008 R2. By default, you can create up to 149 databases for each SQL
Azure server installation, if you need more databases than that; you
must call the Azure business desk to have this limit increased.
When
creating a database you must select the maximum size. The current
options for sizing (and billing) are Web or Business Edition. Web
Edition, the default, supports databases of 1 or 5 GB total. Business
Edition supports databases of up to 50 GB, sized in increments of 10 GB –
in other words, 10, 20, 30, 40 and 50 GB. Currently, both editions are
feature-equivalent.
You set the size limit for your database
when you create it by using the MAXSIZE keyword. You can change the size
limit or the edition (Web or Business) after the initial creation using
the ALTER DATABASE statement. If you reach your size or capacity limit
for the edition you’ve selected, then you will see the error code 40544.
The database size measurement does NOT include the master database, or
any database logs. For more detail about sizing and pricing, see this
link Although you set a maximum size, you are billed based on actual storage used.
It’s important to realize that when you are creating a new database on SQL Azure, you are actually creating
three
replicas of that database. This is done to ensure high availability.
These replicas are completely transparent to you. Currently, these
replicas are in the same data center. The new database appears as a
single unit for your purposes. Failover is transparent and part of the
service you are paying for is a SLA of 99.9% uptime.
After
you’ve created a database, you can quickly get the connection string
information for it by selecting the database in the list on the portal
and then clicking the ‘Connection Strings’ button. You can also test
connectivity via the portal by clicking the ‘Test Connectivity’ button
for the selected database. For this test to succeed you must enable the
‘Allow Microsoft Services to Connect to this Server’ option on the
Firewall Rules tab of the SQL Azure portal.
Creating Your Application
After
you’ve set up your account, created your server, created at least one
database and set a firewall rule so that you can connect to the
database, then you can start developing your application using this data
source.
Unlike with Windows Azure data storage options such as
tables, queues or blobs, when you are using SQL Azure as a data source
for your project, there is
nothing to install in your
development environment. If you are using Visual Studio 2010, you can
just get started – no additional SDKs, tools or anything else are
needed.
Although many developers will choose to use a Windows
Azure front-end with a SQL Azure back-end, this configuration is NOT
required. You can use ANY front-end client with a supported connection
library such as ADO.NET or ODBC. This could include, for example, an
application written in Java or PHP. Of note is that connecting to SQL
Azure via OLE DB is currently not supported.
If you are using
Visual Studio 2010 to develop your application, then you can take
advantage of the included ability to view or create many types of
objects in your selected SQL Azure database installation directly from
the Visual Studio Server Explorer View. These objects are Tables, Views,
Stored Procedures, Functions or Synonyms. You can also see the data
associated with these objects using this viewer. For many developers
using Visual Studio 2010 as their primary tool to view and manage SQL
Azure data will be sufficient. The Server Explorer View window is shown
in Figure
3. Both a local installation of a database and a cloud-based
instance are shown. You’ll note that the tree nodes differ slightly in
the two views. For example there is no Assemblies node in the cloud
installation because custom assemblies are not supported in SQL Azure.
 Figure 3 Viewing Data Connections in Visual Studio
Of
note also in Visual Studio is that using the Entity Framework with SQL
Azure is supported. Also you may choose to use Data-Tier application
packages (or DACPACs) in Visual Studio. You can create, import and / or
modify DACPACS for SQL Azure schemas in VS2010.
Another
developer tool that can now use to create applications which use SQL
Azure as a data source is Visual Studio Light Switch. This is a
light-weight developer environment, based on the idea of ‘data and
screens’ created for those who are tasked with part-time coding, most
especially those who create ‘departmental applications. To try out the
beta version of Visual Studio Light Switch go to this
location .
Shown below (Figure 4) is connecting to a SQL Azure data source using the Light Switch IDE.
 Figure 4 Connecting to SQL Azure in Visual Studio Light Switch
If you are wish to use SQL Azure as a data
source
for Business Intelligence projects, then you’ll use Visual Studio
Business Intelligence Development Studio 2008 (R2 version needed to
connect to SQL Azure). In addition, Microsoft has begun a limited
(invite-only) customer beta of SQL Azure Reporting Services, a version
of SQL Server Reporting Services for Azure. Microsoft has announced that
on the longer-term roadmap for SQL Azure, they are working to
cloud-enable versions of the entire BI stack, that is Analysis Services,
Integration Services and Reporting Services.
More
forward-looking, Microsoft has announced that in vNext of Visual Studio
the BI toolset will be integrated into the core product with full SQL
Azure compatibility and intellisense. This project is code-named
‘Juneau’ and is expected to go into public beta later this year. For
more information (and demo videos of Juneau) see this link.
As
I mentioned earlier, another tool you may want to use to work with SQL
Azure is SQL Server Management Studio 2008 R2. Using SSMS, you actually
have access to a fuller set of operations for SQL Azure databases using
SSMS than in Visual Studio 2010. I find that I use both tools, depending
on which operation I am trying to complete. An example of an operation
available in SSMS (and not in Visual Studio 2010) is creating a new
database using a T-SQL script. Another example is the ability to easily
performance index operations (create, maintain, delete and so on). An
example is shown in Figure 5 below.
Although working with
SQL Azure databases in SSMS 2008 R2 is quite similar to working with an
on-premises SQL Server instance, tasks and functionality are NOT
identical. This is due mostly due to product differences. For example,
you may remember that in SQL Azure the USE statement to CHANGE databases
is NOT supported. A common way to do this when working in SSMS it is to
right click an open query window, then click ‘Connection’>’Change
connection’ on the context-sensitive menu and then to enter the next
database connection information in the ‘Connect to Database Engine’
dialog box that pops up.
Generally when working in SSMS, if an
option isn’t supported in SQL Azure either, you simply can’t see it such
as folders in the Explorer tree not present; context-sensitive
menu-options not available when connected to a SQL Azure instance, or
you are presented with an error when you try to execute a command this
isn’t supported in this version of SQL Server. You’ll also note that
many of the features available with GUI interfaces for SQL Server with
SSMS are exposed only via T-SQL script windows for SQL azure. These
include common features, such as CREATE DATABASE, CREATE LOGIN, CREATE
TABLE, CREATE USER, etc…
One tool that SQL Server DBAs
often ‘miss’ in SQL Azure is SQL Server Agent. This functionality is NOT
supported. However, there are 3
rd party tools as well as community projects, such as the one on CodePlex
here which provide examples of using alternate technologies to create ‘SQL-Agent-like’ functionality for SQL Azure.
 Figure 5 Using SQL Server Management Studio 2008 R2 to Manage SQL Azure
As
mentioned in the discussion of Visual Studio 2010 support, newly
released in SQL Server 2008 R2 is a data-tier application or DAC. DAC
pacs are objects that combine SQL Server or SQL Azure database schemas
and objects into a single entity.
You can use either Visual
Studio 2010 (to build) or SQL Server 2008 R2 SSMS (to extract) to create
a DAC from an existing database. If you wish to use Visual Studio 2010
to work with a DAC, then you’d start by selecting the SQL Server
Data-Tier Application project type in Visual Studio 2010. Then, on the
Solution Explorer, right-click your project name and click ‘Import Data
Tier Application’. A wizard opens to guide you through the import
process. If you are using SSMS, start by right-clicking on the database
you want to use in the Object Explorer, click Tasks, and then click
‘Extract Data-tier Application’ to create the DAC. The generated DAC is a
compressed file that contains multiple T-SQL and XML files. You can
work with the contents by right-clicking the .dacpac file and then
clicking Unpack. SQL Azure supports deleting, deploying, extracting, and
registering DAC pacs, but does
not support upgrading them. Figure 6 below, shows the template in Visual Studio 2010 for working with DACPACs
 Figure 6 The ‘SQL Server Data-tier Application’ template in Visual Studio 2010 (for DACPACs)
Also
of note is that Microsoft has released a CTP version of enhanced
DACPACs, called BACPACs, that support import/export of schema AND data
(via BCP). Find more information
here . Another name for this set of functionality is the import/export tool for SQL Azure.
Another
tool you can use to connect to SQL Azure is the Silverlight-based web
tool called the SQL Azure Web Management tool shown in Figure 7 below.
It’s intended as a zero-install client to manage SQL Azure
installations. To access this tool navigate to the main Azure portal
here,
then click on the ‘Database’ node in the tree view on the left side.
You will next click on the database that you wish to work with and then
click on the ‘Manage’ button on the ribbon. This will open the login box
for the web client. After you enter the login credentials, then a new
web page will open which will allow you to work with that databases’
Tables, Views, Queries and Stored Procedures in a SQL Azure database
installation.
 Figure 7 Using the Silverlight Web Portal to manage a SQL Azure Database
Of course, because the portal is built on Silverlight, you can view, monitor and manage the exposed aspects of SQL Azure with
any browser using the web management tool. Shown below in Figure 8 is the portal running on a MacOS with Google Chrome.
 Figure 8 Using the Silverlight Web Portal to manage a SQL Azure Database on a Mac with Google Chrome
Still another tool you can use to connect to a SQL Azure database is SQLCMD (more information
here ). Of note is that even though SQLCMD is supported, the OSQL command-line tool is not supported by SQL Azure.
Using SQL Azure
So
now you’ve connected to your SQL Azure installation and have created a
new, empty database. So what exactly can you do with SQL Azure?
Specifically you may be wondering what are the limits on creating
objects?
And after those objects have been created, how do you populate
those objects with data? As I mentioned at the beginning of this
article, SQL Azure provides relational cloud data storage, but it does
have some subtle feature differences to an on premise SQL Server
installation. Starting with object creation, let’s look at some of the
key differences between the two.
You can create the most
commonly used objects in your SQL Azure database using familiar methods.
The most commonly used relational objects (which include tables, views,
stored procedures, indices, and functions) are all available. There are
some differences around object creation though. I’ll summarize the
differences in the next paragraph.
SQL Azure tables MUST contain
a clustered index. Non-clustered indices CAN be subsequently created on
selected tables. You CAN create spatial indices; you can NOT create XML
indices. Heap tables are NOT supported. CLR types of Geo-spatial only
types (such as Geography and Geometry) ARE supported. Also Support for
the HierachyID data type IS included. Other CLR types are NOT supported.
View creation MUST be the first statement in a batch. Also view (or
stored procedure) creation with encryption is NOT supported. Functions
CAN be scalar, inline or multi-statement table-valued functions, but can
NOT be any type of CLR function.
There is a complete reference of partially supported T-SQL statements for SQL Azure on MSDN
here .
Before
you get started creating your objects, remember that you will connect
to the master database if you do not specify a different one in your
connection string. In SQL Azure, the USE (database) statement is
not
supported for changing databases, so if you need to connect to a
database other than the master database, then you must explicitly
specify that database in your connection string as shown earlier.
Data Migration and Loading
If
you plan to create SQL Azure objects using an existing, on-premises
database as your source data and structures, then you can simply use
SSMS to script an appropriate DDL to create those objects on SQL Azure.
Use the Generate Scripts Wizard and set the ‘Script for the database
engine type’ option to ‘for SQL Azure’.
An even easier way to generate a script is to use the SQL Azure Migration Wizard available as a download from CodePlex
here . With this handy tool you can generate a script to create the objects and can also load the data via bulk copy using bcp.exe.
You
could also design a SQL Server Integration Services (SSIS) package to
extract and run a DML or DDL script. If you are using SSIS, you’d most
commonly design a package that extracts the DDL from the source
database, scripts that DDL for SQL Azure and then executes that script
on one or more SQL Azure installations. You might also choose to load
the associated data as part of this package’s execution path. For more
information about working with SSIS
here.
Also of note regarding DDL creation and data migration is the CTP release of SQL Azure Data Sync Services
here). You can also see this service in action in a Channel 9 video
here
. Currently SQL Azure Data Sync services works via Synchronization
Groups (HUB and MEMBER servers) and then via scheduled synchronization
at the level of individual tables in the databases selected for
synchronization. For even more about Data Sync listen in to this recent
MSDN geekSpeak show by new SQL Azure MVP
Ike Ellis on his experiences with SQL Azure Data Sync.
You
can use the Microsoft Sync Framework Power Pack for SQL Azure to
synchronize data between a data source and a SQL Azure installation. As
of this writing, this tool is in CTP release and is available
here
. If you use this framework to perform subsequent or ongoing data
synchronization for your application, you may also wish to download the
associated SDK.
What if your source database is larger than the
maximum size for the SQL Azure database installation? This could be
greater than the absolute maximum of 50 GB for the Business Edition or
some smaller limit based on the other program options.
Currently,
customers must partition (or shard) their data manually if their
database size exceeds the program limits. Microsoft has announced that
it will be providing a federation (or auto-partitioning utility) for SQL
Azure in the future. For more information about how Microsoft plans to
implement federation, read
here.
To support federations new T-SQL syntax will be introduced. From the
blog post referenced above, Figure 9, below, shows a conceptual
representation of that new syntax.
 Figure 9 SQL Azure Federation (conceptual syntax)
As of this writing SQL Azure Federation customer beta program has been announced. To Sign up go
here
It’s
important to note that T-SQL table partitioning is NOT supported in SQL
Azure. There is also a free utility called Enzo SQL Shard (available
here) that you can use for partitioning your data source.
You’ll
want to take note of some other differences between SQL Server and SQL
Azure regarding data loading and data access. Added recently is the
ability to copy a SQL Azure database via the Database copy command. The
syntax for a cross-server copy is as follows:
CREATE DATABASE DB2A AS COPY OF Server1.DB1A
The
T-SQL INSERT statement IS supported (with the exceptions of updating
with views or providing a locking hint inside of an INSERT statement).
Related further to data migration is that T-SQL DROP DATABASE and other
DDL commands have additional limits when executed against a SQL Azure
installation. Also the T-SQL RESTORE and ATTACH DATABASE commands are
not supported. Finally, the T-SQL statement EXECUTE AS (login) is not
supported.
If you are migrating from a data source other than
SQL Server, there are also some free tools and wizards available to make
the job easier. Specifically there is an Access to SQL Azure Migration
wizard and a MySQL to SQL Azure Migration wizard. Both work similarly to
the SQL Azure Migration wizard in that they allow you to map the source
schema to a destination schema, then create the appropriate DDL, then
they allow you to configure and to execute the data transfer via bcp. A
screen from the
MySQL to SQL Azure Migration wizard is shown in Figure
10 below.
Here are links for some of these tools:
1) Access to SQL Azure Migration Wizard –
here
2) MySQL to SQL Azure Migration Wizard –
here
3)
Oracle to SQL Server Migration Wizard (you will have to manually set
the target version to ‘SQL Azure’ for appropriate DDL script generation)
–
here
 Figure 10 Migration from MySQL to SQL Azure wizard screen
For
even more information about migration, you may want to listen in to a
recently recorded a 90 minute webcast with more details (and demos!) for
Migration scenarios to SQL Azure - listen in
here.
Joining me on this webcast is the creator of the open-source SQL Azure
Migration Wizard – George Huey. I also posted a version of this
presentation (both slides and screencast) on my blog –
here.
Data Access and Programmability
Now let’s take a look at common programming concerns when working with cloud data.
First
you’ll want to consider where to set up your development environment.
If you are an MSDN subscriber and can work with a database under 1 GB,
then it may well make sense to develop using only a cloud installation
(sandbox). In this way there will be no issue with migration from local
to cloud. Using a regular (i.e. not MSDN subscriber) SQL Azure account
you could develop directly against your cloud instance (most probably a
using a cloud-located copy of your production database). Of course
developing directly from the cloud is not practical for all situations.
If
you choose to work with an on-premises SQL Server database as your
development data source, then you must develop a mechanism for
synchronizing your local installation with the cloud installation. You
could do that using any of the methods discussed earlier, and tools like
Data Sync Services and Sync Framework are being developed with this
scenario in mind.
As long as you use only the supported
features, the method for having your application switch from an
on-premise SQL Server installation to a SQL Azure database is simple –
you need only to change the connection string in your application.
Regardless
of whether you set up your development installation locally or in the
cloud, you’ll need to understand some programmability differences
between SQL Server and SQL Azure. I’ve already covered the T-SQL and
connection string differences. In addition all tables must have a
clustered index at minimum (heap tables are not supported). As
previously mentioned, the USE statement for changing databases isn’t
supported.
This also means that there is no support for distributed
(cross-database) transactions or queries, and linked servers are not
supported.
Other options
not available when working with a SQL Azure database include:
- Full-text indexing
- CLR custom types (however the built-in Geometry and Geography CLR types are supported)
- RowGUIDs (use the uniqueidentifier type with the NEWID function instead)
- XML column indices
- Filestream datatype
- Sparse columns
Default
collation is always used for the database. To make collation
adjustments, set the column-level collation to the desired value using
the T-SQL COLLATE statement. And finally, you cannot currently use SQL
Profiler or the Database Tuning Wizard on your SQL Azure database.
Some important tools that you CAN use with SQL Azure for tuning and monitoring are the following:
- SSMS Query Optimizer to view estimated or actual query execution plan details and client statistics
- Select Dynamic Management views to monitor health and status
-
Entity Framework to connect to SQL Azure after the initial model and
mapping files have been created by connecting to a local copy of your
SQL
Azure database.
Depending of what type of application you
are developing, you may be using SSAS, SSRS, SSIS or Power Pivot. You
CAN also use any of these products as CONSUMERS of SQL Azure database
data. Simply connect to your SQL Azure server and selected database
using the methods already described in this article.
Another
developer consideration is in understanding the behavior of
transactions. As mentioned, only local (within the same database)
transactions are supported. Also it is important to understand that the
only transaction isolation level available for a database hosted on SQL
Azure is READ COMMITTED SNAPSHOT. Using this isolation level, readers
get the latest consistent version of data that was available when the
statement STARTED. SQL Azure does not detect update conflicts. This is
also called an optimistic concurrency model, because lost updates,
non-repeatable reads and phantoms can occur. Of course, dirty reads
cannot occur.
Yet another method of accessing SQL Azure data programmatically is via OData. Currently in CTP and available
here
, you can try out exposing SQL Azure data via an OData interface by
configuring this at the CTP portal. For a well-written introduction to
OData, read
here . Shown in Figure 11 below is one of the (CTP) configuration screens for exposing SQL Azure data as OData.
 Figure 11 SQL OData (CTP) configuration
Database Administration
Generally
when using SQL Azure, the administrator role becomes one of logical
installation management. Physical management is handled by the platform.
From a practical standpoint this means there are no physical servers to
buy, install, patch, maintain or secure. There is no ability to
physically place files, logs, tempdb and so on in specific physical
locations. Because of this, there is no support for the T-SQL commands
USE <database>, FILEGROUP, BACKUP, RESTORE or SNAPSHOT.
There
is no support for the SQL Agent on SQL Azure. Also, there is no ability
(or need) to configure replication, log shipping, database mirroring or
clustering. If you need to maintain a local, synchronized copy of SQL
Azure schemas and data, then you can use any of the tools discussed
earlier for data migration and synchronization – they work both ways.
You can also use the DATABASE COPY command. Other than keeping data
synchronized, what are some other tasks that administrators may need to
perform on a SQL Azure installation?
Most commonly, there will
still be a need to perform logical administration. This includes tasks
related to security and performance management. Of note is that in SQL
Azure only there are two new database roles in the master database which
are intended for security management. These roles are
dbmanager (similar to SQL Server’s dbcreator role) and (similar to SQL Server’s securityadmin role)
loginmanager.
Also certain common usernames are not permitted. These include ‘sa’,
‘admin’, ‘administrator’, ‘root’ and ‘guest’. Finally passwords must
meet complexity requirements. For more, read Kalen Delaney’s TechNET
Article on SQL Azure security
here .
Additionally,
you may be involved in monitoring for capacity usage and associated
costs. To help you with these tasks, SQL Azure provides a public Status
History dashboard that shows current service status and recent history
(an example of history is shown in Figure 12)
here .
 Figure 12 SQL Azure Status History
There is also a
new
set of error codes that both administrators and developers should be
aware of when working with SQL Azure. These are shown in Figure 13
below. For a complete set of error codes for SQL Azure see
this MSDN reference. Also, developers may want to take a look at
this MSDN code sample on how to programmatically decode error messages.
 Figure 13 SQL Azure error codes
SQL
Azure provides a high security bar by default. It forces SSL encryption
with all permitted (via firewall rules) client connections.
Server-level logins and database-level users and roles are also secured.
There are no server-level roles in SQL Azure. Encrypting the connection
string is a best practice. Also, you may wish to use Windows Azure
certificates for additional security. For more detail read
here .
In
the area of performance, SQL Azure includes features such as
automatically killing long running transactions and idle connections
(over 30 minutes). Although you cannot use SQL Profiler or trace flags
for performance tuning, you can use SQL Query Optimizer to view query
execution plans and client statistics. A sample query to SQL Azure with
Query Optimizer output is shown in Figure 14 below. You can also perform
statistics management and index tuning using the standard T-SQL
methods.
 Figure 15 SQL Azure query with execution plan output shown
There
is a select list of dynamic management views (covering database,
execution or transaction information) available for database
administration as well. These include sys.dm_exec_connections ,
_requests , _sessions, _tran_database_transactions,
_active_transactions, _partition_stats For a complete list of supported
DMVs for SQL Azure see
here .
There
are also some new views such as sys.database_usage and
sys.bandwidth_usage. These show the number, type and size of the
databases and the bandwidth usage for each database so that
administrators can understand SQL Azure billing. Also
this blog post gives a sample of how you can use T-SQL to calculate estimated cost of service.
Here
is yet another MVP’s view of how to calculate billing based on using
these views. A sample is shown in Figure 16. In this view, quantity is
listed in KB. You can monitor space used via this command:
SELECT SUM(reserved_page_count) * 8192 FROM sys.dm_db_partition_stats
 Figure 16 Bandwidth Usage in SQL Query
Further
around SQL Azure performance monitoring, Microsoft has released an
installable tool which will help you to better understand performance.
It produces reports on ‘longest running queries’, ‘max CPU usage’ and
‘max IO usage’. Shown in Figure 17 below is a sample report screen for
the first metric. You can download this tool from this
location
 Figure 17 Top 10 CPU consuming queries for a SQL Azure workload
You
can also access the current charges for the SQL Azure installation via
the SQL Azure portal by clicking on the Billing link at the top-right
corner of the screen. Below in Figure 18 is an example of a bill for SQL
Azure.
 Figure 18 Sample Bill for SQL Azure services
Learn More and Roadmap
Product updates announced at TechEd US / May 2011 are as follows:
- SQL Azure Management REST API – a web API for managing SQL Azure servers.
- Multiple servers per subscription – create multiple SQL Azure servers per subscription.
- JDBC Driver – updated database driver for Java applications to access SQL Server and SQL Azure.
- DAC Framework 1.1 – making it easier to deploy databases and in-place upgrades on SQL Azure.
For deeper technical details you can read more in the MSDN documentation
here .
Microsoft
has also announced that is it is working to implement database backup
and restore, including point-in-time restore for SQL Azure databases.
This is a much-requested feature for DBAs and Microsoft has said that
they are prioritizing the implementation of this feature set due to
demand.
To learn more about SQL Azure, I suggest you download
the Windows Azure Training Kit. This includes SQL Azure hands-on
learning, whitepapers, videos and more. The training kit is available
here. There is also a project on Codeplex which includes downloadable code, sample videos and more
here . Also you will want to read the SQL Azure Team Blog
here, and check out the MSDN SQL Azure Developer Center
here .
If you want to continue to preview upcoming features for SQL Azure, then you’ll want to visit SQL Azure Labs
here.
Show below in Figure 19, is a list our current CTP programs. As of
this writing, those programs include – OData, Data Sync and
Import/Export. SQL Azure Federations has been announced, but is not
open to invited customers.
 Figure 19 SQL Azure CTP programs
A final area you may want to check out is the
Windows Azure Data Market.
This is a place for you to make data sets that you choose to host on
SQL Azure publically available. This can be at no cost or for a fee.
Access is via Windows Live ID. You can connect via existing clients,
such as the latest version of the Power Pivot add-in for Excel, or
programmatically. In any case, this is a place for you to ‘advertise’
(and sell) access to data you’ve chosen to host on SQL Azure.
Conclusion
Are
you still reading? Wow! You must be really interested in SQL Azure.
Are you using it? What has your experience been? Are you interested,
but NOT using it yet? Why not? Are you using some other type of
cloud-data storage (relational or non-relational)? What is it, how do
you like it? I welcome your feedback.
Happy coding!
What is SQL Azure?
SQL Azure is Microsoft’s solution for SQL Server in the cloud. It has a few key differences from traditional SQL Server:
- Database maximum size is 1GB or 10GB based on your price plan, but no larger
- You can have as many databases as you want, but they may not be on the same server
- There’s no cross-database querying
- There’s no SQL Azure encryption
- It supports a subset of SQL Server’s T-SQL commands, but not all of them
- It supports a subset of SQL Server’s datatypes, but not all of them
I like to think of it as SQL Server Lite – it’s an excellent stepping
stone to the real thing. Build your app from the ground up for SQL
Azure, and it’s pretty easy to support full-blown SQL Server down the
road if your needs change.
How does SQL Azure pricing compare to SQL Server costs?
Azure is a lot cheaper if you only need one database – $10/month for
1gb of data, and $100/month for 10gb of data. Pricing is per database,
not per application – you can write multiple applications to query the
same database. Price is only one part of the equation, though.
The more databases you need, or the larger databases you need, the
more it makes sense to have your own SQL Server. Generally speaking, I
tell companies that if you have any of these requirements, SQL Azure
probably isn’t for you:
- More than one department that needs to store data in SQL Server permanently
- You don’t have at least 2 very senior-level programmers who understand the concept of sharding
- You face security concerns involving HIPAA, SOX, or PCI compliance
- You’ve already built a schema and/or an application
I’m not saying you can’t meet those needs with SQL Azure, but
generally speaking, you’re not the target market for Azure v1.0. On the
other hand, if you have the following requirements, Azure might be a
very good fit for you:
- No full-time IT staff, no DBAs
- No datacenter (or maybe not even an office)
- No (or very, very little) legacy code, and you’re building a new app from scratch
- You don’t mind putting in extra man-hours in the beginning to avoid capital investments
In that situation, Azure might make good sense, but you’re going to have to plan your way around Azure’s limitations.
Why does SQL Azure have a 10GB limit?
I can’t speak for Microsoft, but it would make sense to put a small
database size limit to make sure queries run fast. If you’ve got a 10GB
database, it’s easy to make sure every query runs blazing fast. Throw
hardware at the problem, throw a lot of indexes at it, and you’ll get
good performance. Keeping things small also makes backup & recovery
easier, and makes high availability design easier.
There are no SQL Azure RAM limits or CPU limits. You have no control
over how much CPU power or memory your database gets. SQL Server 2008
has a Resource Governor that allows database administrators to throttle
queries based on login or database, but Azure doesn’t support those
features.
How can I load balance SQL Azure or do cross-database joins?
Since SQL Azure databases max out at 10GB, it would be great if we
could create several databases on the same server and use a view to
select from all of them. No dice – that’s not supported. As of
February 2010, your application has to know which databases to query.
If you need to combine results from multiple databases, you’ll need to
do that processing inside the application by querying all of the
databases and then joining the results together in the app.
Scaling SQL Azure this way is called
sharding
– partitioning your data into different shards, each stored in a
different database (or even different servers.) Design your app like
this, and it will scale like crazy. If you’re the kind of coder who
loves
reading the stories on HighScalability.com,
you’ll love sharding. If you’ve never heard of HighScalability.com,
you don’t want to architect your own sharded database – bring in
somebody who lives this stuff.
How do I handle the SQL Azure backup process?
Unfortunately, right now, you have to build one yourself. SQL Azure
does not support the BACKUP command. You’ll need to figure out how to
sync your data out to an external database, and while you’re doing that
design, keep in mind that you pay Microsoft for data transfers in &
out of SQL Azure.
Microsoft states that Azure is highly available and contains its own
backups across multiple servers. However, just as RAID is not a backup,
high availability is not a backup either. You need backups if you want
protection from any of these scenarios:
BSOD-T - get yours today!
- Your app might accidentally delete or modify data
- Your users might accidentally delete or modify data
- A hacker might purposely delete or modify data
- Or believe it or not, Microsoft services just might go down.
Remember, folks, as much as I love Microsoft, we’re talking about the company that brought you
the Blue Screen of Death. You would be irresponsible not to back up your data for your own protection. (
T-shirt available for around $25, and if you want different colors or shirts, click the Customize button after the link.)
How good is SQL Azure performance?
The biggest SQL Azure bottleneck is your bandwidth, because all Azure
queries go from your application to Microsoft’s servers and back.
Azure developers report that they’re very satisfied with the query
speed, and usually report that it’s faster than servers they’ve built
themselves.
The problem will arise when you’re not satisfied with SQL Azure’s performance. You’ll want to ask these questions:
- What else is querying my database right now?
- What does my query execution plan look like?
- What indexes could I add to make this query run faster?
- Is another Azure database hammering the server right now?
Unfortunately, SQL Azure doesn’t support any commands, dynamic
management views (DMVs), or functions that will help you answer those
questions.
Can I use SQL Azure as a backup with log shipping or database mirroring?
No.
Don’t think of SQL Azure as your disaster recovery solution – it
doesn’t work that way. If you design your database for sharding, then
you can work out a method to sync between Azure and full-blown SQL
Server, but right now you’re very much inventing the wheel. Your next
question would be how to run Azure inside your own datacenter so that
you could keep an identical environment between production (Azure) and
disaster recovery (your place.)
How do I run Microsoft SQL Azure on commodity hardware?
You can’t run SQL Azure in-house on your own hardware. It only runs
in Microsoft’s datacenters. If you want to develop against Azure but
you don’t want to pay for Azure, you have two options.
Option #1 is to
buy SQL Server Developer Edition for under $50.
It’s functionally equivalent to SQL Server Enterprise Edition, but the
license prohibits using it in production. You’ll have to restrict
yourself to only using the Azure-level features, though – if you
accidentally design your schema to use, say, full text search, it’ll
work fine on Developer Edition, but it won’t work in Azure.
Option #2 is to get an MSDN subscription with Azure benefits.
What SQL Azure plans do MSDN subscribers get for free?
It depends on your level of MSDN/Visual Studio:


