Showing posts with label Silverlight 4. Show all posts

Wednesday, 3 October 2012

Silverlight 4 Communicating with Excel

When a Silverlight 4 application is running with Elevated Permissions you can access COM objects which can be quite handy.  For example you may want to open Outlook and send an email, or as in the example presented here open Excel and create a new worksheet


Silverlight and Excel 


It is important to include the following namespace when wanting to use these features:

using System.Windows.Interop;
You will also need to add a reference to the Microsoft.CSharp.dll which can be found in:

Program Files/Microsoft SDKs/Silverlight/V4.0/Libraries/Client/


<UserControl x:Class="SilverlightExcel.MainPage"
    xmlns="http://schemas.microsoft.com/winfx/2006/xaml/presentation"
    xmlns:x="http://schemas.microsoft.com/winfx/2006/xaml"
    xmlns:d="http://schemas.microsoft.com/expression/blend/2008"
    xmlns:mc="http://schemas.openxmlformats.org/markup-compatibility/2006"
    mc:Ignorable="d"
    d:DesignHeight="300" d:DesignWidth="400">

    <Grid x:Name="LayoutRoot" Background="White">
        <Button Content="Create XLS" Width="100" Height="30" Click="Button_Click" />
    </Grid>
</UserControl>


using System;
using System.Collections.Generic;
using System.Linq;
using System.Net;
using System.Windows;
using System.Windows.Controls;
using System.Windows.Documents;
using System.Windows.Input;
using System.Windows.Media;
using System.Windows.Media.Animation;
using System.Windows.Shapes;
using System.Windows.Interop;
using System.Runtime.InteropServices.Automation;

namespace SilverlightExcel
{
    public partial class MainPage : UserControl
    {
        public MainPage()
        {
            InitializeComponent();
        }

        private void Button_Click(object sender, RoutedEventArgs e)
        {
            dynamic excel = AutomationFactory.CreateObject("Excel.Application");
            excel.Visible = true;

            dynamic workbook = excel.workbooks;
            workbook.Add();
            dynamic sheet = excel.ActiveSheet;

            dynamic range;

            range = sheet.Range("A1");
            range.Value = "Hello from Silverlight";
            range = sheet.Range("A2");
            range.Value = "100";
            range = sheet.Range("A3");
            range.Value = "50";
            range = sheet.Range("A4");
            range.Formula = "=@Sum(A2..A3)";
            range.Calculate();
        }
    }
}


Here we use the new C# 4.0 dynamic keyword to create and hold the Excel application object.  The following causes Excel to actually load and display:

excel.Visible = true;

Next we add a new Workbook and get a reference to the current Worksheet.  When we have our worksheet we are ready to populate the worksheet cells, for this example we set values in column A.  First we set the column header, then two values and the final cell is a formula to add the two values together.
 

Saturday, 25 August 2012

How to add Sound Effects, Music and Video to your Silverlight App.

Add three buttons to your Silverlight and three MediaElements control to our MainPage.xaml.

The first button is for playing music, second is for sound, and the third for video.

Copy and paste following code to MainPage.Xaml

    <Grid x:Name="LayoutRoot" Background="White">
        <Canvas Background="AliceBlue">
            <Button Click="Button_Click_Music" Canvas.Left="10" Canvas.Top="10" Width="80" Height="30" Content="Play Music"></Button>
            <Button Click="Button_Click_Sound" Canvas.Left="100" Canvas.Top="10" Width="80" Height="30" Content="Play Sound"></Button>
            <Button Click="Button_Click_Video" Canvas.Left="200" Canvas.Top="10" Width="80" Height="30" Content="Play Video"></Button>
            <MediaElement x:Name="MySoundFile" Source="aerobics.mp3" AutoPlay="False"></MediaElement>
            <MediaElement x:Name="MymusicFile" Source="dance.mp3" AutoPlay="False"></MediaElement>
            <MediaElement Width="300" Height="300" Canvas.Top="100" x:Name="MyVideoFile" AutoPlay="False" Source="seeVideo.wmv"></MediaElement>
        </Canvas>
    </Grid>


Copy and paste following code to MainPage.Xaml.cs
    public partial class MainPage : UserControl
    {
        public MainPage()
        {
            InitializeComponent();
        }
        private void StopAll()
        {
            MymusicFile.Stop();
            MySoundFile.Stop();
            MyVideoFile.Stop();
        }

        private void Button_Click_Music(object sender, RoutedEventArgs e)
        {
            StopAll();
            MymusicFile.Play();
        }

        private void Button_Click_Sound(object sender, RoutedEventArgs e)
        {
            StopAll();
            MySoundFile.Play();
        }

        private void Button_Click_Video(object sender, RoutedEventArgs e)
        {
            StopAll();
            MyVideoFile.Play();
        }
    }


.Play() Method will Play your Mediaelement.

.Stop() Method will Stop your Media

AutoPlay="True" will set the media in play mode by default.

How to change Theme dynamically in SilverLight 4

This article will show how you can change Themes in Silverlight  dynamically at runtime.
Available themes in SilverLight are-

1)Bubble Creme
2)Bureau Black
3)Bureau Blue
4)Expression Dark
5)Expression Light
6)Rainier Orange
7)Rainier Purple
8)Shiny Blue
9)Shiny Red
10)Twilight Blue
11)Whistler Blue

To implement the Themes for the MainPage.xaml .Follow the following Steps:

1)Make sure you have added all the Theming dlls which are available in April2010 silverlight Toolkit. You can download this toolkit from
http://silverlight.codeplex.com/releases/view/43528

2)Copy and paste following code in Views/Home.xaml
In the below code add the following two xml namespaces
xmlns:toolkit=http://schemas.microsoft.com/winfx/2006/xaml/presentation/toolkit
xmlns:local="clr-namespace:newApp" (‘newApp’ is the assembly name of Silverlight project)

<navigation:Page x:Class="newApp.Home"
    xmlns="http://schemas.microsoft.com/winfx/2006/xaml/presentation"
    xmlns:x="http://schemas.microsoft.com/winfx/2006/xaml"
    xmlns:d="http://schemas.microsoft.com/expression/blend/2008" xmlns:mc="http://schemas.openxmlformats.org/markup-compatibility/2006"
    xmlns:navigation="clr-namespace:System.Windows.Controls;assembly=System.Windows.Controls.Navigation"
    xmlns:local="clr-namespace:newApp"
    mc:Ignorable="d" d:DesignWidth="640" d:DesignHeight="480"
    Title="Home"
    Style="{StaticResource PageStyle}" xmlns:sdk="http://schemas.microsoft.com/winfx/2006/xaml/presentation/sdk">

    <Grid x:Name="LayoutRoot">
        <Grid.Resources>
            <local:ThemeChangeCommand x:Key="themeCommand" />
        </Grid.Resources>
       
        <Button Content="New Theme" Height="23" HorizontalAlignment="Left" Margin="60,111,0,0" Name="button1" VerticalAlignment="Top" Width="75" />
        <ScrollViewer x:Name="PageScrollViewer" Style="{StaticResource PageScrollViewerStyle}">

            <StackPanel x:Name="ContentStackPanel">

                <TextBlock x:Name="HeaderText" Style="{StaticResource HeaderTextStyle}"
                                   Text="Home"/>
                <TextBlock x:Name="ContentText" Style="{StaticResource ContentTextStyle}"
                                   Text="Home page content"/>
                <ListBox Height="100" Name="listBox1" Width="120" />
                <CheckBox Content="CheckBox" Height="16" Name="checkBox1" />
                <RadioButton Content="RadioButton" Height="16" Name="radioButton1" />
                <TextBlock Height="23" Name="textBlock1" Text="TextBlock" Width="119" />
                <ComboBox Height="23" Name="comboBox1" Width="120" />
            </StackPanel>

        </ScrollViewer>
    </Grid>

</navigation:Page>


3)Add one Class called   ThemeChangeCommand.cs  for handling the requests.
using System;
using System.Net;
using System.Windows;
using System.Windows.Controls;
using System.Windows.Documents;
using System.Windows.Ink;
using System.Windows.Input;
using System.Windows.Media;
using System.Windows.Media.Animation;
using System.Windows.Shapes;
using System.Windows.Controls.Theming;

namespace newApp
{
  
        public class ThemeChangeCommand : ICommand
        {
            #region ICommand Members

            public bool CanExecute(object parameter)
            {
                return true;
            }

            public event EventHandler CanExecuteChanged;

            public void Execute(object parameter)
            {
                Theme themeContainer = (Theme)((FrameworkElement)Application.Current.RootVisual).FindName("ThemeContainer");


                string themeName = parameter as string;


                if (themeName == null)
                {
                    themeContainer.ThemeUri = null;
                   
                   
                }
                else
                {
                    themeContainer.ThemeUri = new Uri("/System.Windows.Controls.Theming." + themeName + ";component/Theme.xaml", UriKind.RelativeOrAbsolute);
                   
                }

                if (CanExecuteChanged != null)
                    CanExecuteChanged(this, new EventArgs());
            }

            #endregion
       
    }
}


4)The job is done. Press F5 and once the page is loaded Right-Click on the MainPage to get the Context Menu having the list of available themes .Click on the Theme of your choice and then you can see all the controls according to the new Theme. See the below screen shot for more details

Populating Silverlight Chart on clicking on Legend Items

To get single graph on clicking on to legend Items

In the following article we will add three areaseries to a chart. On clicking to each LegendItem we can get that particular legend series.

Please add the refrence of following assembly
    1)System.Windows.Controls.DataVisualization.Toolkit
    2)System.Windows.Controls.DataVisualization.Toolkit

Create a class YearlyCarSold.cs and copy and paste following code

public class YearlyCarSold
    {
        private string _Year;
        private int _NoOfCars;

        public YearlyCarSold(string year, int cars)
        {
            _Year = year;
            _NoOfCars = cars;
        }

        public string Year
        {
            get { return _Year; }
            set { _Year = value; }
        }

        public int NoOfCars
        {
            get { return _NoOfCars; }
            set { _NoOfCars = value; }
        }

    }

Create another class SeriesData.cs  and copy and paste following code

public class SeriesData
    {
         public List<YearlyCarSold> GetSeriesData(string val,int k)
        {
            List<YearlyCarSold> list = new List<YearlyCarSold>();
            list.Add(new YearlyCarSold("2002" + val, 8000 + k));
            list.Add(new YearlyCarSold("2003" + val, 9000 + k));
            list.Add(new YearlyCarSold("2004" + val, 10000 + k));
            list.Add(new YearlyCarSold("2005" + val, 11000 + k));
            list.Add(new YearlyCarSold("2006" + val, 12000 + k));
            list.Add(new YearlyCarSold("2007" + val, 9000 + k));
            list.Add(new YearlyCarSold("2008" + val, 500 + k));
            list.Add(new YearlyCarSold("2009" + val, 1000 + k));
            return list;
        }
    }


Now Create a MainPage.xaml
<UserControl x:Class="bargraph.MainPage"
    xmlns="http://schemas.microsoft.com/winfx/2006/xaml/presentation"
              xmlns:toolkit="http://schemas.microsoft.com/winfx/2006/xaml/presentation/toolkit"
    xmlns:x="http://schemas.microsoft.com/winfx/2006/xaml"
    xmlns:d="http://schemas.microsoft.com/expression/blend/2008"
    xmlns:mc="http://schemas.openxmlformats.org/markup-compatibility/2006"
              xmlns:vc="clr-namespace:System.Windows.Controls.DataVisualization;assembly=System.Windows.Controls.DataVisualization.Toolkit"
             xmlns:vc1="clr-namespace:System.Windows.Controls;assembly=System.Windows.Controls.Toolkit"
              xmlns:datavis="clr-namespace:System.Windows.Controls.DataVisualization;assembly=System.Windows.Controls.DataVisualization.Toolkit"
            
    mc:Ignorable="d"
    d:DesignHeight="300" d:DesignWidth="400">
    <UserControl.Resources>
        <Style x:Key="LegendItemStyle" TargetType="toolkit:LegendItem">
            <Setter Property="IsTabStop" Value="False" />
            <Setter Property="Template">
                <Setter.Value>
                    <ControlTemplate TargetType="toolkit:LegendItem">
                        <CheckBox Click="CheckBox_Click" Cursor="Hand" IsChecked="true" Content="{TemplateBinding Content}" Tag="{TemplateBinding Content}">
                            <CheckBox.Template>
                                <ControlTemplate TargetType="CheckBox">
                                    <StackPanel Orientation="Horizontal">
                                        <Rectangle Width="8" Height="8" Fill="{Binding Background}" Stroke="{Binding BorderBrush}"
                                                   StrokeThickness="1" Margin="0,0,3,0" />
                                        <datavis:Title Content="{TemplateBinding Content}" />
                                    </StackPanel>
                                </ControlTemplate>
                            </CheckBox.Template>
                            <ToolTipService.ToolTip>
                                <ToolTip Content="Click to hide/show."></ToolTip>
                            </ToolTipService.ToolTip>
                        </CheckBox>
                    </ControlTemplate>
                </Setter.Value>
            </Setter>
        </Style>
    </UserControl.Resources>
    <Grid x:Name="LayoutRoot">
        <toolkit:Chart x:Name="chartSample" Background="Silver"  BorderBrush="Black" BorderThickness="3" UseLayoutRounding="False" >
           
        </toolkit:Chart>
    </Grid>
</UserControl>


And  Copy and paste following code in MainPage.xaml.cs
   public partial class MainPage : UserControl
    {
        public MainPage()
        {
            InitializeComponent();
            Loaded += new RoutedEventHandler(MainPage_Loaded);
        }

        void MainPage_Loaded(object sender, RoutedEventArgs e)
        {
            System.Windows.Controls.DataVisualization.Charting.Compatible.ColumnSeries perf1 = GetMethod("1", 1);
            System.Windows.Controls.DataVisualization.Charting.Compatible.ColumnSeries perf2 = GetMethod("2", 2);
            System.Windows.Controls.DataVisualization.Charting.Compatible.ColumnSeries perf3 = GetMethod("3", 3);
            try
            {
                //chartSample.Series.Clear();
                chartSample.Series.Add(perf1);
                chartSample.Series.Add(perf2);
                chartSample.Series.Add(perf3);
                chartSample.Title = "Last 24 Hours Disk Utilization (% Total Available Free Space)";//% Used Space)";
              

                // this.chartSample.Legend = legend1;

            }
            catch (Exception ex)
            {
                throw ex;
            }
        
        }


        System.Windows.Controls.DataVisualization.Charting.Compatible.ColumnSeries GetMethod(string k, int l)
        {
            SeriesData seriesData = new SeriesData();
            // COLUMNSERIES
            System.Windows.Controls.DataVisualization.Charting.Compatible.ColumnSeries perf = new System.Windows.Controls.DataVisualization.Charting.Compatible.ColumnSeries();

            //UNCOMMENT FOR BARSERIES//
            // System.Windows.Controls.DataVisualization.Charting.Compatible.BarSeries perf = new System.Windows.Controls.DataVisualization.Charting.Compatible.BarSeries();            //System.Windows.Controls.DataVisualization.Charting.Compatible.ColumnSeries perf = new System.Windows.Controls.DataVisualization.Charting.Compatible.ColumnSeries();

            //UNCOMMENT FOR LineSeries//
            //System.Windows.Controls.DataVisualization.Charting.Compatible.LineSeries perf = new System.Windows.Controls.DataVisualization.Charting.Compatible.LineSeries();

            //UNCOMMENT FOR PieSeries//
            //PieSeries perf = new PieSeries();

            //UNCOMMENT FOR PieSeries//
            // System.Windows.Controls.DataVisualization.Charting.Compatible.ScatterSeries perf = new System.Windows.Controls.DataVisualization.Charting.Compatible.ScatterSeries();
            perf.Name = k;
            perf.IsSelectionEnabled = true;

            perf.ItemsSource = seriesData.GetSeriesData(k, l);
            perf.IndependentValueBinding = new System.Windows.Data.Binding("NoOfCars");
            perf.DependentValueBinding = new System.Windows.Data.Binding("Year");
            //perf.TransitionDuration = new TimeSpan(0, 0, 5);
            perf.Title = k;
            Style style = this.Resources["LegendItemStyle"] as Style;
            perf.LegendItemStyle = style;

            return perf;
        }

       
           private void CheckBox_Click(object sender, RoutedEventArgs e)
        {
            CheckBox chk = (sender as CheckBox);

            System.Windows.Controls.DataVisualization.Charting.Compatible.ColumnSeries ls = this.chartSample.Series.Cast<System.Windows.Controls.DataVisualization.Charting.Compatible.ColumnSeries>().Where(s => s.Title.ToString() == chk.Tag.ToString()).ElementAtOrDefault(0);

            chartSample.Series.Clear(); // Clears the chart
            chartSample.Series.Add(ls); // Add Single series

            // Uncomment to check for all three graph
            //if (chk.IsChecked.Value)
            //    chk.Opacity = ls.Opacity = 1;
            //else
            //{
            //    chk.Opacity = 0.5;
            //    ls.Opacity = 0;
            //}
        }
    }

And that’s it….enjoy playing with graph…

Tuesday, 10 July 2012

DynamicBind datagrid columns in Silverlight DataGrid


This article explains how to create dynamic columns and rows for a Silverlight DataGrid control. It helps create a new DataGrid from scratch in code-behind, populated with values from a System.Collections.Generic.Dictionary.

Binding dynamic content to DataGrid

The following function binds a StringTable object to a Silverlight DataGrid control. The StringTable object is a simple Dictionary explained below.

private void BindStringTableToDataGrid(StringTable table, DataGrid dataGrid)
{
    dataGrid.ItemsSource = table.Values;
    dataGrid.AutoGenerateColumns = false;
     
    dataGrid.Columns.Clear();
    foreach (string columnName in table.ColumnNames)
    {
        DataGridTextColumn textColumn = new DataGridTextColumn();
        textColumn.Header = columnName;
        textColumn.Binding = new Binding();
        textColumn.Binding.Converter = new ColumnValueSelector();
        textColumn.Binding.ConverterParameter = columnName;
        dataGrid.Columns.Add(textColumn);
    }
}

Note that AutoGenerateColumns property of DataGrid is set to "false". This is to prevent DataGrid from creating columns for other properties of StringRow like Count, Keys, etc.
About StringTable

The StringTable is a simple Dictionary class with row-indices as Keys and StringRow as Values.
public class StringTable : Dictionary<int, StringRow>
{
    public List<string> ColumnNames { get; set; }
     
    public StringTable()
    {
        ColumnNames = new List<string>();
    }
}

where StringRow is an alias of the following declaration. Key is the column-name and Value is the column-value of the corresponding row.
 1public class StringRow : Dictionary<string, string>
2{
3}

For more sophisticated table data-structure with advanced helper and utility methods, .

The ColumnValueSelector

The ColumnValueSelector is a converter class extended from IValueConverter. This converter is used to get the column value of the current row.
01public class ColumnValueSelector : IValueConverter
02{
03    object IValueConverter.Convert(object value, Type targetType, object parameter, CultureInfo culture)
04    {
05        StringRow row = (StringRow)value;
06        string columnName = (string)parameter;
07        return (row[columnName]);
08    }
09     
10    object IValueConverter.ConvertBack(object value, Type targetType, object parameter, CultureInfo culture)
11    {
12        throw new NotImplementedException();
13    }
14}

How this works?

Since ItemsSource property of DataGrid expects a collection object, we assign it the Values property of the StringTable object. In StringTable, the column-values of each row is represented by a StringRow i.e. Dictionary<string, string>. That is, each StringRow is created as one row in the DataGrid, and each entry in the StringRow is created as one column in that row. The ColumnValueSelector is used to get the column value of the corresponding row. The column-name is passed to the converter through ConverterParameter property of the datagrid column's Binding property.

Thursday, 5 July 2012

Tuesday, 1 May 2012

Expander Control is a Collapsable panel

Step 1
Start Microsoft Visual Web Developer 2010 Express, then Select File then New Project... Select "Visual Basic" then "Silverlight Application" from Templates, select a Location if you wish, then enter a name for the Project and then click OK, see below:

New Project

Step 2

New Silverlight Application window should appear, uncheck the box "Host the Silverlight Application in a new Web site" and then select the required Silverlight Version, see below:

New Silverlight Application

Step 3

A Blank Page named MainPage.xaml should then appear, see below:
MainPage.xaml

Step 4

Select from the Main Menu: "File" then "Add", then "New Project..." The "New Project" window should appear, select "Silverlight Class Library" with the Name "Expander" without the quotes, see below:
Add Silverlight Class Library Project

Step 5

In the "Choose the version of Silverlight you want to target from the list of installed Silverlight SDK's" choose the same version of Silverlight for example Silverlight 4 and click OK.
Then in the Solution Explorer for "Expander", click on the "Class1.vb" entry, then goto Properties and change the File Name to "Expander.vb" (without the quotes), see below:

Expander Class Properties

Step 6
In the "You are renaming a file. Would you also like to perform a rename in this project of all references to the code element 'Class1'?" choose Yes.
Right Click on the Entry for the "Expander" Project (not the Expander.vb) in Solution Explorer and choose "Add" then "New Folder", and give it the Name "Themes" (again without quotes), see below:

Expander Project Themes Folder

Step 7

Right Click on the Entry for the "Themes" Folder for the Expander Project, and choose "Add", then "New Item...", select "Silverlight Resource Dictionary" with the Name "Generic.xaml", without quotes, see below:

Generic.xaml Resource Dictionary

Step 8

In the XAML Pane for the Generic.xaml, in the "ResourceDictionary" tag type the following XAML namespace:
xmlns:local="clr-namespace:Expander"
See below:
Resource Dictionary Namespaces

Step 9

While still the XAML Pane for the Generic.xaml, above the "</ResourceDictionary>" tag and below the top "<ResourceDictionary>" tag, type the following XAML:

<Style TargetType="local:Expander">
  <Setter Property="Template">
    <Setter.Value>
      <ControlTemplate TargetType="local:Expander">
        <Grid>
          <VisualStateManager.VisualStateGroups>
            <VisualStateGroup x:Name="ViewStates">
              <VisualStateGroup.Transitions>
                <VisualTransition GeneratedDuration="0:0:0.5"/>
              </VisualStateGroup.Transitions>
              <VisualState x:Name="Expanded">
                <Storyboard>
                  <DoubleAnimation Storyboard.TargetName="ContentScaleTransform"
                      Storyboard.TargetProperty="ScaleY" To="1" Duration="0"/>
                  <DoubleAnimation Storyboard.TargetName="RotateButtonTransform"
                      Storyboard.TargetProperty="Angle" To="180" Duration="0"/>
                </Storyboard>
              </VisualState>
            <VisualState x:Name="Collapsed">
              <Storyboard>
                <DoubleAnimation Storyboard.TargetName="ContentScaleTransform"
                    Storyboard.TargetProperty="ScaleY" To="0" Duration="0"/>
                <DoubleAnimation Storyboard.TargetName="RotateButtonTransform"
                    Storyboard.TargetProperty="Angle" To="0" Duration="0"/>
              </Storyboard>
            </VisualState>
          </VisualStateGroup>
        </VisualStateManager.VisualStateGroups>
          <Border BorderBrush="{TemplateBinding BorderBrush}"
              BorderThickness="{TemplateBinding BorderThickness}"
              CornerRadius="{TemplateBinding CornerRadius}"
              Background="{TemplateBinding Background}">
            <Grid>
              <Grid.RowDefinitions>
                <RowDefinition Height="Auto"/>
                <RowDefinition Height="Auto"/>
              </Grid.RowDefinitions>
              <Grid Margin="3">
                <Grid.ColumnDefinitions>
                  <ColumnDefinition Width="Auto"/>
                  <ColumnDefinition Width="Auto"/>
                </Grid.ColumnDefinitions>
                <ContentPresenter Margin="3" Content="{TemplateBinding HeaderContent}"/>
                <ToggleButton Grid.Column="1" RenderTransformOrigin="0.5,0.5" Margin="3" x:Name="ExpandCollapseButton">
                  <ToggleButton.Template>
                    <ControlTemplate>
                      <Grid>
                        <Ellipse Width="20" Height="20" Stroke="#FFA9A9A9" Fill="AliceBlue"/>
                        <Path RenderTransformOrigin="0.5,0.5" HorizontalAlignment="Center" VerticalAlignment="Center" 
                            Data="M1,1.5L4.5,5 8,1.5" Stroke="#FF666666" StrokeThickness="2"/>
                      </Grid>
                    </ControlTemplate>
                  </ToggleButton.Template>
                  <ToggleButton.RenderTransform>
                    <RotateTransform x:Name="RotateButtonTransform"/>
                  </ToggleButton.RenderTransform>
                </ToggleButton>
              </Grid>
              <ContentPresenter Grid.Row="1" Margin="5" Content="{TemplateBinding Content}" x:Name="Content">
                <ContentPresenter.RenderTransform>
                  <ScaleTransform x:Name="ContentScaleTransform"/>
                </ContentPresenter.RenderTransform>
              </ContentPresenter>
            </Grid>
          </Border>
        </Grid>
      </ControlTemplate>
    </Setter.Value>
  </Setter>
</Style>

See below:
Expander Resource Dictionary

Step 10

Double Click on the Entry for the "Expander.vb" Class in Solution Explorer in the "Expander" project.
In the Code View for Expander above the "Public Class Expander" line type the following:
Imports System.Windows.Controls.Primitives
<TemplateVisualState(Name:="Collapsed", GroupName:="ViewStates"),
TemplateVisualState(Name:="Expanded", GroupName:="ViewStates"),
TemplatePart(Name:="Content", Type:=GetType(FrameworkElement)),
TemplatePart(Name:="ExpandCollapseButton", Type:=GetType(ToggleButton))>
See Below:
Expander.vb Imports and Template

Step 11

While still in the Code View for Expander.vb, below the "Public Class Expander" line type the following:
Inherits ContentControl

Private _useTransitions As Boolean = True
Private _collapsedState As VisualState
Private _toggleExpander As ToggleButton
Private _contentElement As FrameworkElement
See Below:
Expander.vb Declarations
.
Step 12
While still in the Code View for Expander.vb, above the "End Class" for "Public Class Expander", type the following Dependency Properties:
Public Shared ReadOnly HeaderContentProperty As DependencyProperty =
DependencyProperty.Register("HeaderContent", GetType(Object),
GetType(Expander), Nothing)

Public Shared ReadOnly IsExpandedProperty As DependencyProperty =
DependencyProperty.Register("IsExpanded", GetType(Boolean),
GetType(Expander), New PropertyMetadata(True))

Public Shared ReadOnly CornerRadiusProperty As DependencyProperty =
DependencyProperty.Register("CornerRadius", GetType(CornerRadius),
GetType(Expander), Nothing)
See Below:
Expander.vb Dependancy Properties
Step 13
While still in the Code View for Expander.vb, above the "End Class" for "Public Class Expander", type the following Properties:
Public Property HeaderContent() As Object
  Get
    Return GetValue(HeaderContentProperty)
  End Get
  Set(ByVal value As Object)
    SetValue(HeaderContentProperty, value)
  End Set
End Property

Public Property IsExpanded() As Boolean
  Get
    Return CBool(GetValue(IsExpandedProperty))
  End Get
  Set(ByVal value As Boolean)
   SetValue(IsExpandedProperty, value)
  End Set
End Property

Public Property CornerRadius() As CornerRadius
  Get
    Return CType(GetValue(CornerRadiusProperty), CornerRadius)
  End Get
  Set(ByVal value As CornerRadius)
    SetValue(CornerRadiusProperty, value)
  End Set
End Property
See Below:
Expander.vb Properties
Step 14
While still in the Code View for Expander.vb, above the "End Class" for "Public Class Expander", type the following Constructor and Sub:
Public Sub New()
  DefaultStyleKey = GetType(Expander)
End Sub

Private Sub ChangeVisualState(ByVal useTransitions As Boolean)
  If IsExpanded Then
    If _contentElement IsNot Nothing Then
      _contentElement.Visibility = Visibility.Visible
    End If
    VisualStateManager.GoToState(Me, "Expanded", useTransitions)
  Else
    VisualStateManager.GoToState(Me, "Collapsed", useTransitions)
    _collapsedState = TryCast(GetTemplateChild("Collapsed"), VisualState)
    If _collapsedState Is Nothing Then
      If _contentElement IsNot Nothing Then
        _contentElement.Visibility = Visibility.Collapsed
      End If
    End If
  End If
End Sub
See Below:
Expander.vb Constructor and Sub
Step 15
While still in the Code View for Expander.vb, above the "End Class" for "Public Class Expander", type the following Event Handlers:
Private Sub Toggle_Click(ByVal sender As Object, ByVal e As RoutedEventArgs)
  IsExpanded = Not IsExpanded
  _toggleExpander.IsChecked = IsExpanded
  ChangeVisualState(_useTransitions)
End Sub

Private Sub Collapsed_Completed(ByVal sender As Object, ByVal e As EventArgs)
  _contentElement.Visibility = Visibility.Collapsed
End Sub

Public Overrides Sub OnApplyTemplate()
  MyBase.OnApplyTemplate()
  _toggleExpander = TryCast(GetTemplateChild("ExpandCollapseButton"), ToggleButton)
  If _toggleExpander IsNot Nothing Then
    AddHandler _toggleExpander.Click, AddressOf Toggle_Click
  End If
  _contentElement = TryCast(GetTemplateChild("Content"), FrameworkElement)
  If _contentElement IsNot Nothing Then
    _collapsedState = TryCast(GetTemplateChild("Collapsed"), VisualState)
    If (_collapsedState IsNot Nothing) AndAlso (_collapsedState.Storyboard IsNot Nothing) Then
      AddHandler _collapsedState.Storyboard.Completed, AddressOf Collapsed_Completed
    End If
  End If
  ChangeVisualState(False)
End Sub
See Below:
Expander.vb Event Handlers
Step 16
Select Debug then the "Build Expander" option from the menu, see below:
Build Expander
Step 17
Return to the MainPage.xaml Designer View by selecting the "MainPage.xaml" Tab, or Double Clicking on the Entry for "MainPage.xaml" in Solution Explorer for the Main Project.
Then from the All Silverlight Controls section in the Toolbox select the Canvas control:
Canvas Control
Step 18
Draw a Canvas that fill the whole Page or in the XAML Pane between the "<Grid>" and "</Grid>" lines type the following XAML:
<Canvas Height="300" Width="400" HorizontalAlignment="Left" VerticalAlignment="Top" Name="Page">
</Canvas>
See below:
MainPage with Canvas
Step 19
Then from the Expander Controls section in the Toolbox select the Expander control:
Expander Control
Step 20
Draw an Expander on the Page (Canvas) by dragging the Button from the Toolbox onto the Canvas, then in the XAML Pane inbetween the "<Canvas>" and "</Canvas>" tags change the "my:Expander" XAML to the following:

<my:Expander Canvas.Left="75" Canvas.Top="25" Height="250" Width="250" HeaderContent="Expander">
  <my:Expander.Content>
    <StackPanel>
      <Button Margin="4" Padding="4" Content="Button One"/>
      <Button Margin="4" Padding="4" Content="Button Two"/>
      <Button Margin="4" Padding="4" Content="Button Three"/>
      <Button Margin="4" Padding="4" Content="Button Four"/>
    </StackPanel>
  </my:Expander.Content>
</my:Expander>

See below:
MainPage with Canvas and Expander
Step 21
Save the Project as you have now finished the Silverlight application. Select Debug then Start Debugging or click on Start Debugging:
Start Debugging
After you do, the following will appear in a new Web Browser window:
Application Running
Step 22
Click on the Round button with the Arrow to Collapse or Expand the Expander, see below:
Expander Control
Step 23
Close the Application and Browser window by clicking on the Close Button Close on the top right of the Application Window and Web Browser to Stop the application.
This is a simple example of how to create an Expander, it could be extended to support more Properties such as a HeaderContent Background colour for example. Try adding more features and make it your own!

Download Tutorial (458KB)

  Download Source Code (11.2KB)

Saturday, 21 April 2012

Customizes WCF RIA Services code

So in this article I will describe how the code generation in RIA services SP1 works and I will demonstrate some scenarios and ideas were customizing the generated code is a nice technique to extend your own framework. I will try to focus on the code generation aspects so views and viewmodels, dynamic loading of modules, ... will not be handled in these examples.

WCF RIA Services code generation

I'm using RIA Services since the first betas because it is a powerful framework which generates a lot of Silverlight client code for you. When you have implemented entities, DTO's and domain services on the server side an MSBuild task will automatically generate client proxies each time you build your project. RIA Services can also copy validation or other logic from the service side to the client. For each DomainService a client side DomainContext will be created and these DomainContexts will load your entities and DTO's and they support change tracking and submitting changes.

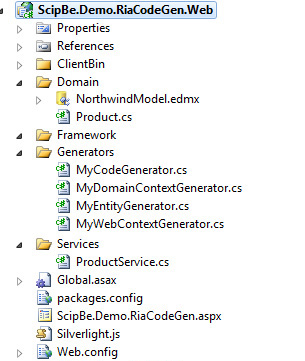
Setup of demo application
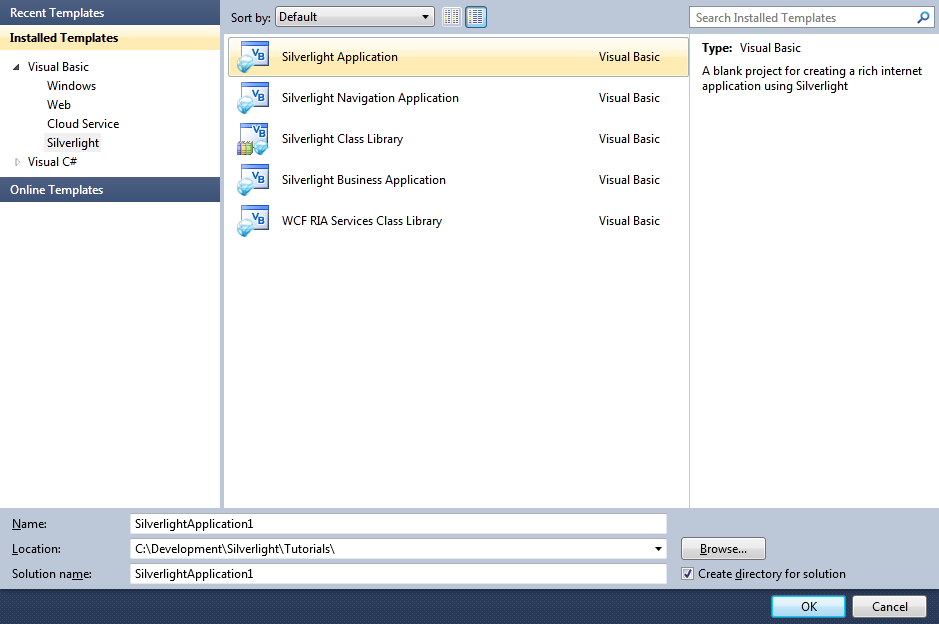
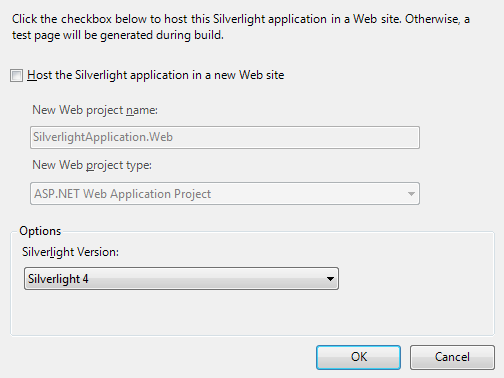
I created a simple Silverlight Navigation Application with an ASP.NET project . At server side I created a folder called Domain with an Entity Framework Model that includes some entities of the Northwind database.

In the folder Services a RIA DomainService class was implemented for the Product entity. This ProductService looks like this:
using System.Data;
using System.Linq;
using System.ServiceModel.DomainServices.EntityFramework;
using System.ServiceModel.DomainServices.Hosting;
using System.ServiceModel.DomainServices.Server;
using ScipBe.Demo.RiaCodeGen.Web.Domain;
 
namespace ScipBe.Demo.RiaCodeGen.Web.Services
{
    [EnableClientAccess()]
    public class ProductService : LinqToEntitiesDomainService<NorthwindEntities>
    {
        [Query(IsDefault = true)]
        public IQueryable<Product> GetProducts()
        {
            var products = ObjectContext.Products;
            return products;
        }
 
        public IQueryable<Product> GetProductsByName(string searchText)
        {
            var products = ObjectContext.Products.Where(p => p.ProductName.Contains(searchText));
            return products;
        }
 
        public void InsertProduct(Product product)
        {
            if ((product.EntityState != EntityState.Detached))
            {
                ObjectContext.ObjectStateManager.ChangeObjectState(product, EntityState.Added);
            }
            else
            {
                ObjectContext.Products.AddObject(product);
            }
        }
 
        public void UpdateProduct(Product currentProduct)
        {
            ObjectContext.Products.AttachAsModified(currentProduct, ChangeSet.GetOriginal(currentProduct));
        }
 
        public void DeleteProduct(Product product)
        {
            if ((product.EntityState != EntityState.Detached))
            {
                ObjectContext.ObjectStateManager.ChangeObjectState(product, EntityState.Deleted);
            }
            else
            {
                ObjectContext.Products.Attach(product);
                ObjectContext.Products.DeleteObject(product);
            }
        }
    }
}
The Silverlight project has a WCF RIA Services link to the server side ASP.NET project which hosts the DomainServices.

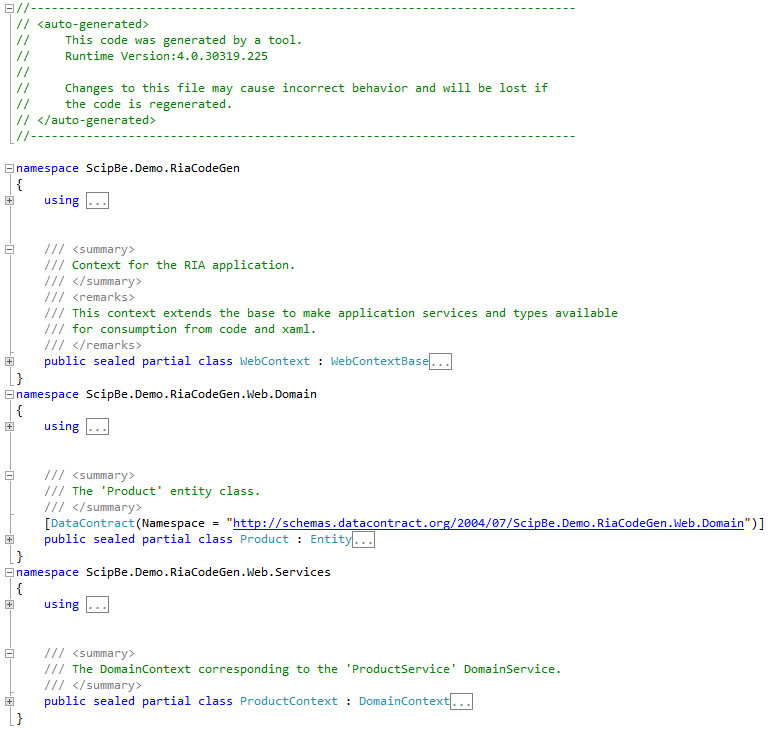
When you build the solution the code geneneration will be executed. In the hidden folder Generated_Code in the Silverlight project you will find following default generated client code.
RIA Services Default Code Generation
Now you can easily access the your product data in Silverlight by calling Load methods of the ProductContext class:
var context = new ProductContext();
 
context.Load(context.GetProductsQuery());
 
context.Load(
    context.GetProductsByNameQuery("ton"), 
    LoadBehavior.MergeIntoCurrent, 
    loadOperation => 
    {
        var products = context.Products;
        var loadedEntities = loadOperation.Entities;
    }, 
    null);
For more information about RIA Services you can read the documentation at MSDN.

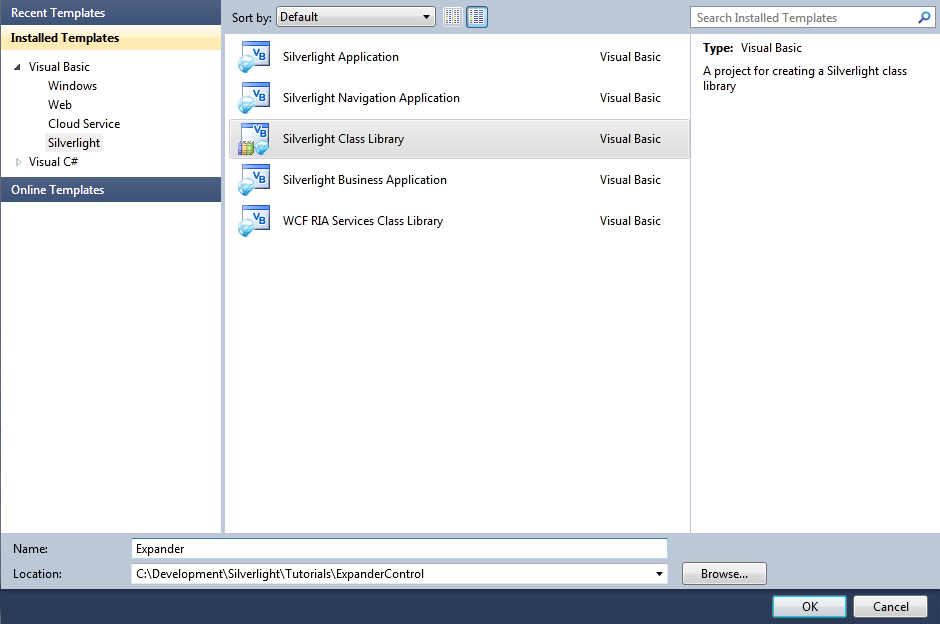
Installation of Toolkit

Now we can start modifying this project. First of all we have to install the WCF RIA Services Toolkit (April 2011). You can download the installation package from the Microsoft website.

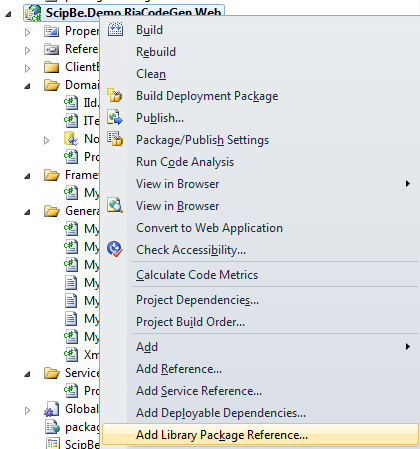
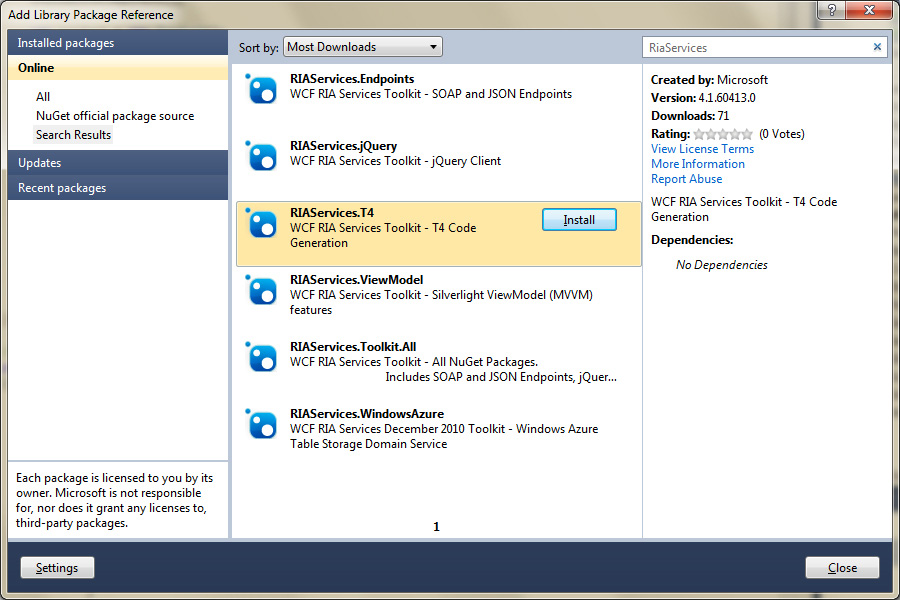
Another and easier way is to open the new package manager NuGet which is available after installing Visual Studio SP1. Choose Get Library Package Reference and look for RiaServices in the online gallery. Then install the RIAServices.T4 library.
Get Library Package Reference
NuGet RIAServices.T4
Since the April update of the Toolkit you do not need to modify the Silverlight project file anymore. Before this release it was required to add the <RiaClientCodeGeneratorName> tag in the project file.


T4 Code generation classes

The T4 Code Generator classes are included in the Microsoft.ServiceModel.DomainServices.Tools and Microsoft.ServiceModel.DomainServices.Tools.TextTemplate assemblies. The T4 Code Generator consists of 2 parts:
The CSharpClientCodeGenerator class and the DomainServiceClientCodeGenerator attribute are the main components that hook into the extensibility features of the WCF RIA Services code generation process.
Secondly there are 5 different code generators:
  • CSharpDomainContextGenerator
  • CSharpEntityGenerator
  • CSharpComplexObjectGenerator
  • CSharpEnumGenerator
  • CSharpWebContextGenerator
Each of the 5 code generators have protected virtual methods which you can override to change the code generation of a specific part of a class (class declaration, constructor, property, ...). And finally there is a TransformText method which contains all the generated code.
So in my server project I added a Generators folder with a MyCodeGenerator class derived from CSharpClientCodeGenerator and decorated with the DomainServiceClientCodeGenerator attribute.
Code Generator Classes
using Microsoft.ServiceModel.DomainServices.Tools;
using Microsoft.ServiceModel.DomainServices.Tools.TextTemplate;
using Microsoft.ServiceModel.DomainServices.Tools.TextTemplate.CSharpGenerators;
 
namespace ScipBe.Demo.RiaCodeGen.Web.Generators
{
    [DomainServiceClientCodeGenerator("MyCodeGenerator", "C#")]
    public class MyCodeGenerator : CSharpClientCodeGenerator
    {
        protected override EntityGenerator EntityGenerator
        {
            get { return new MyEntityGenerator(); }
        }
 
        protected override DomainContextGenerator DomainContextGenerator
        {
            get { return new MyDomainContextGenerator(); }
        }
 
        protected override WebContextGenerator WebContextGenerator
        {
            get { return new MyWebContextGenerator(); }
        }
 
        protected override ComplexObjectGenerator ComplexObjectGenerator
        {
            get { return base.ComplexObjectGenerator; }
        }
 
        protected override EnumGenerator EnumGenerator
        {
            get { return base.EnumGenerator; }
        }
    }
}
I also created 3 other generator classes for the entity, domain context and web context.
using Microsoft.ServiceModel.DomainServices.Tools.TextTemplate.CSharpGenerators;
using ScipBe.Demo.RiaCodeGen.Web.Domain;
 
namespace ScipBe.Demo.RiaCodeGen.Web.Generators
{
    public class MyEntityGenerator : CSharpEntityGenerator
    {
        public override string TransformText()
        {
            return base.TransformText();
        }

        protected override void GenerateClassDeclaration()
        {
            base.GenerateClassDeclaration();
        }
 
        protected override void GenerateProperty(PropertyDescriptor propertyDescriptor)
        {
            base.GenerateProperty(propertyDescriptor);
        }
     }
}
 
namespace ScipBe.Demo.RiaCodeGen.Web.Generators
{
    public class MyDomainContextGenerator : CSharpDomainContextGenerator
    {
        public override string TransformText()
        {
            return base.TransformText();
        }
 
        protected override void GenerateClassDeclaration()
        {
            base.GenerateClassDeclaration();
        }
    }
}
namespace ScipBe.Demo.RiaCodeGen.Web.Generators
{
    public class MyWebContextGenerator : CSharpWebContextGenerator
    {
        public override string TransformText()
        {
            return base.TransformText();
        }
 
        protected override void GenerateClassDeclaration()
        {
            base.GenerateClassDeclaration();
        }
    }
}
If you build your project again you will see that the generated code (ScipBe.Demo.RiaCodeGen.Web.g.cs) will be different from the default code generation. The functionality is the same but the order of the classes differs and comment headers are not generated.
Let us start manipulating the default code generation behaviour.


Adding interfaces to the generated entities

Wouldn't it be handy if you could use the same interfaces for your entities at server and client side? With just a few lines of code we can accomplish this. First I created an IId interface with an int Id property. I renamed the key properties in my Northwind EDM and I added the IId interface in the partial class of each entity.
namespace ScipBe.Demo.RiaCodeGen.Web.Domain
{
    public interface IId
    {
        int Id { get; set; }
    }
}
namespace ScipBe.Demo.RiaCodeGen.Web.Domain
{
    public partial class Product : IId
    {
    }
}
Because the interface is also needed on client side I created a shared link to this file in the Domain folder in my Silverlight project.

In the MyEntityGenerator class I implemented the GenerateClassDeclaration method and there I added a using to the namespace of the IId interface.
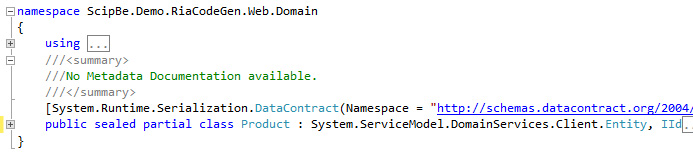
 Finally in the TransformText method I check if the entity is derived from IId and then this interface is added in the generated code by replacing strings.
namespace ScipBe.Demo.RiaCodeGen.Web.Generators
{
    public class MyEntityGenerator : CSharpEntityGenerator
    {
        protected override void GenerateClassDeclaration()
        {
            WriteLine("using ScipBe.Demo.RiaCodeGen.Web.Domain;");
            base.GenerateClassDeclaration();
        }
 
        public override string TransformText()
        {
            var generatedCode = base.TransformText();
 
            if (typeof(IId).IsAssignableFrom(Type))
            {
                generatedCode = generatedCode
                    .Replace(
                    "System.ServiceModel.DomainServices.Client.Entity",
                    "System.ServiceModel.DomainServices.Client.Entity, IId");
            }
 
            return generatedCode;
        }
    }
}
The generated code will look like this:


Adding attributes to the generated entities

The same approach can be used to decorate the generated client entities with attributes. I like to use the DebuggerVisualizer attribute which makes it easier to inspect collection of entities in the Local and Watch windows of Visual Studio. So on server side I decorated the Product class with the DebuggerDisplay attribute.
using System.Diagnostics;
 
namespace ScipBe.Demo.RiaCodeGen.Web.Domain
{
    [DebuggerDisplay("{ProductName}")]
    public partial class Product : IId
    {
    }
}
In the TransformText method in the MyEntityGenerator class I added some code to check if the class is decorated with the attribute and then I replace some of the generated code. Don't forget to add the using of System.Diagnostics.
using Microsoft.ServiceModel.DomainServices.Tools.TextTemplate.CSharpGenerators;
using ScipBe.Demo.RiaCodeGen.Web.Domain;
 
namespace ScipBe.Demo.RiaCodeGen.Web.Generators
{
    public class MyEntityGenerator : CSharpEntityGenerator
    {
        protected override void GenerateClassDeclaration()
        {
            WriteLine("using System.Diagnostics;");
            base.GenerateClassDeclaration();
        }
 
        public override string TransformText()
        {
            var generatedCode = base.TransformText();
 
            var debuggerDisplayAttributes = Type.GetCustomAttributes(typeof(DebuggerDisplayAttribute), true)
                .Cast<DebuggerDisplayAttribute>().FirstOrDefault();
 
            if (debuggerDisplayAttributes != null)
            {
                var displayName = debuggerDisplayAttributes.Value;
                generatedCode = generatedCode
                    .Replace("public sealed partial class", 
                    "[DebuggerDisplay(\"" + displayName + "\")]\r\n public sealed partial class");
            }
 
            return generatedCode;
        }
    }
}
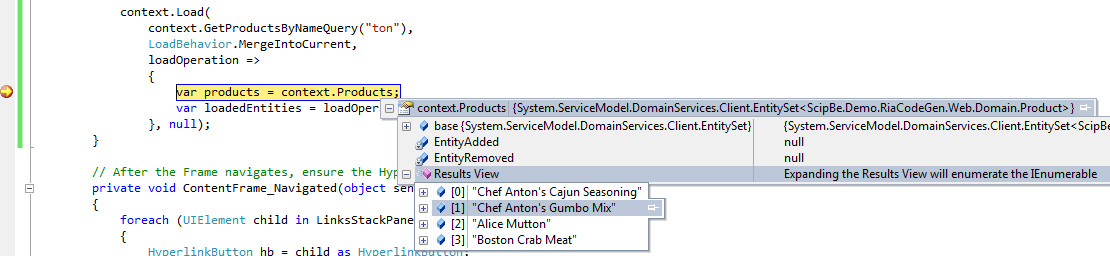
When debugging the Silverlight project you will be able to see the names of the products in Visual Studio Locals, Watches and tooltip windows.


Using derived data annotation attributes

The Entity Framework and RIA Services support several data annotation attributes like Required, StringLength, RegularExpression, Range, ... You can add these attributes in your own metadata classes but RIA Services also adds them automatically for constraints which are defined on the database. By modifying the generated code you can implement your own derived attributes.
using System.ComponentModel.DataAnnotations;
 
namespace ScipBe.Demo.RiaCodeGen.Framework
{
    public class MyRequiredAttribute : RequiredAttribute
    {
    }
}
public override string TransformText()
{
    var generatedCode = base.TransformText();
 
    generatedCode = generatedCode
        .Replace("[System.ComponentModel.DataAnnotations.RequiredAttribute()]", "[MyRequired]");
 
    return generatedCode;
}

protected override void GenerateClassDeclaration()
{
    WriteLine("using ScipBe.Demo.RiaCodeGen.Framework;");
    base.GenerateClassDeclaration();
}

Adding XML comments to the generated entities

I also found a nice example of an implementation of the T4 Code Generators at the blog of Yavor Georgiev who is a Program Manager at Microsoft. He describes how you can copy the XML comment of the classes and properties of EDM entities.

I tried to improve his sources a little bit and moved the logic to a XmlCommentsProvider class.
using System;
using System.Linq;
using System.Xml.Linq;
using System.Text;
using System.IO;
using System.ComponentModel;
using System.Diagnostics;
 
namespace ScipBe.Demo.RiaCodeGen.Web.Generators
{
    public class XmlCommentsProvider
    {
        private XElement comments;
 
        public XmlCommentsProvider(Type classType, string path)
        {
            var assemblyXmlFileName = path.Replace("dll", "xml");
            comments = XElement.Load(new FileStream(assemblyXmlFileName, FileMode.Open));
        }
 
        private XElement FindCommentElementByName(string name)
        {
            return comments
                .Descendants("member")
                .Where(x => String.Compare(x.Attributes("name").FirstOrDefault().Value.ToString(), name, true) == 0)
                .FirstOrDefault();
        }
 
        private string PrintInnerXml(XElement element)
        {
            string[] lines = element.Nodes()
                .Aggregate("", (b, node) => b += node.ToString())
                .Split(new string[] { Environment.NewLine }, StringSplitOptions.RemoveEmptyEntries);
 
            var sb = new StringBuilder();
            foreach (string line in lines)
            {
                sb.AppendLine(line.Trim().Insert(0, "///"));
            }
            return sb.ToString().Trim();
        }
 
        public string GetClassComments(Type classType)
        {
            var element = FindCommentElementByName("T:" + classType.FullName);
 
            if (element != null)
            {
                return PrintInnerXml(element);
            }
 
            return null;
        }
 
        public string GetPropertyComments(PropertyDescriptor propertyDescriptor)
        {
            var element = FindCommentElementByName("P:" + propertyDescriptor.ComponentType.FullName + "." + propertyDescriptor.Name);
 
            if (element != null)
            {
                return PrintInnerXml(element);
            }
 
            return null;
        }
    }
}
Now I can call the XmlCommentsProvider. GetClassComments method in the GenerateClassDeclaration method and XmlCommentsProvider. GetPropertyComments in the GenerateProperty method.
namespace ScipBe.Demo.RiaCodeGen.Web.Generators
{
    public class MyEntityGenerator : CSharpEntityGenerator
    {
        XmlCommentsProvider xmlCommentsProvider;
 
        protected override void GenerateClassDeclaration()
        {
            // Add XML documentation for class
            xmlCommentsProvider =new XmlCommentsProvider(this.Type, this.ClientCodeGenerator.Options.ClientProjectPath);
            WriteLine(xmlCommentsProvider.GetClassComments(this.Type));
 
            base.GenerateClassDeclaration();
        }
 
        protected override void GenerateProperty(PropertyDescriptor propertyDescriptor)
        {
            // Add XML documentation for property
            if (xmlCommentsProvider != null)
            {
                var comments = xmlCommentsProvider.GetPropertyComments(propertyDescriptor);
                if (!string.IsNullOrEmpty(comments))
                {
                    WriteLine(comments);
                }
            }
 
            base.GenerateProperty(propertyDescriptor);
        }
    }
}
If you add comments to the entity


then the final generated code will look like this:


Using derived classes for entities, domain contexts and the web context

I always prefer to create derived classes from the .NET classes in my framework so that I have the freedom to add new or modify default behaviour. On server side I always implement my own DomainService class. Now we can also implement derived classes on the client for Entity, DomainContext and WebContext. So I added 3 classes MyEntity, MyDomainContext and MyWebContext in a Framework folder in the Silverlight project.

using System.Runtime.Serialization;
using System.ServiceModel.DomainServices.Client;
 
namespace ScipBe.Demo.RiaCodeGen.Framework
{
    [DataContract]
    public class MyEntity : Entity
    {
    }
}
using System;
using System.Diagnostics;
using System.ServiceModel;
using System.ServiceModel.DomainServices.Client;
 
namespace ScipBe.Demo.RiaCodeGen.Framework
{
    public abstract class MyDomainContext : DomainContext
    {
    }
}
using System.ServiceModel.DomainServices.Client.ApplicationServices;
 
namespace ScipBe.Demo.RiaCodeGen.Framework
{
    public class MyWebContext : WebContextBase
    {
    }
}
The next step is very easy and you just have to replace some text in the TransformText method. This is how my MyEntityGenerator class will look with all the previous examples implemented.
using System;
using System.ComponentModel;
using System.Diagnostics;
using System.Linq;
using Microsoft.ServiceModel.DomainServices.Tools.TextTemplate.CSharpGenerators;
using ScipBe.Demo.RiaCodeGen.Web.Domain;
 
namespace ScipBe.Demo.RiaCodeGen.Web.Generators
{
    public class MyEntityGenerator : CSharpEntityGenerator
    {
        XmlCommentsProvider xmlCommentsProvider;
 
        public override string TransformText()
        {
            var myEntity = "MyEntity";
            if (typeof(IId).IsAssignableFrom(Type))
            {
                myEntity += ", IId";
            }
 
            var generatedCode = base.TransformText();
 
            var debuggerDisplayAttributes = Type.GetCustomAttributes(typeof(DebuggerDisplayAttribute), true)
                .Cast<DebuggerDisplayAttribute>().FirstOrDefault();
 
            if (debuggerDisplayAttributes != null)
            {
                var displayName = debuggerDisplayAttributes.Value;
                generatedCode = generatedCode
                    .Replace("public sealed partial class", 
                    "[DebuggerDisplay(\"" + displayName + "\")]\r\n    public sealed partial class");
            }
 
            generatedCode = generatedCode
                .Replace("System.ServiceModel.DomainServices.Client.Entity", myEntity);
 
            generatedCode = generatedCode
                .Replace("[System.ComponentModel.DataAnnotations.RequiredAttribute()]", "[MyRequired]");
 
            return generatedCode;
        }
 
        protected override void GenerateClassDeclaration()
        {
            WriteLine("using ScipBe.Demo.RiaCodeGen.Framework;");
            WriteLine("using ScipBe.Demo.RiaCodeGen.Web.Domain;");
            WriteLine("using System.Diagnostics;");
 
            // Add XML documentation for class
            xmlCommentsProvider = new XmlCommentsProvider(this.Type);
            WriteLine(xmlCommentsProvider.GetClassComments(this.Type));
 
            base.GenerateClassDeclaration();
        }
 
        protected override void GenerateProperty(PropertyDescriptor propertyDescriptor)
        {
            // Add XML documentation for property
            if (xmlCommentsProvider != null)
            {
                var comments = xmlCommentsProvider.GetPropertyComments(propertyDescriptor);
                if (!string.IsNullOrEmpty(comments))
                {
                    WriteLine(comments);
                }
            }
 
            base.GenerateProperty(propertyDescriptor);
        }
    }
}
The MyDomainContextGenerator and MyWebContextGenerator classes are implemented in the same way.
using Microsoft.ServiceModel.DomainServices.Tools.TextTemplate.CSharpGenerators;
 
namespace ScipBe.Demo.RiaCodeGen.Web.Generators
{
    public class MyDomainContextGenerator : CSharpDomainContextGenerator
    {
        public override string TransformText()
        {
            return base.TransformText()
                .Replace(
                "System.ServiceModel.DomainServices.Client.DomainContext", 
                "MyDomainContext");
        }
 
        protected override void GenerateClassDeclaration()
        {
            WriteLine("using ScipBe.Demo.RiaCodeGen.Framework;");
            base.GenerateClassDeclaration();
        }
    }
}
using Microsoft.ServiceModel.DomainServices.Tools.TextTemplate.CSharpGenerators;
 
namespace ScipBe.Demo.RiaCodeGen.Web.Generators
{
    public class MyWebContextGenerator : CSharpWebContextGenerator
    {
        public override string TransformText()
        {
            return base.TransformText()
                .Replace(
                "System.ServiceModel.DomainServices.Client.ApplicationServices.WebContextBase", 
                "MyWebContext");
        }
 
        protected override void GenerateClassDeclaration()
        {
            WriteLine("using ScipBe.Demo.RiaCodeGen.Framework;");            
            base.GenerateClassDeclaration();
        }
    }
}
The generated code will have following changes:


Implementing your own logic in the derived classes

Now you can start to add your own logic in these framework classes. For example you could modify the endpoint timeouts in the MyDomainContext class. It is a lot easier to debug a Silverlight RIA Services application when the timeouts are increased.
namespace ScipBe.Demo.RiaCodeGen.Framework
{
    public abstract class MyDomainContext : DomainContext
    {
        public MyDomainContext(DomainClient domainClient) : base(domainClient)
        {
            var channelFactory = (ChannelFactory)DomainClient.GetType().GetProperty("ChannelFactory").GetValue(DomainClient, null);
 
            var timeout = new TimeSpan(0, 5, 00);
            if (Debugger.IsAttached)
            {
                timeout = new TimeSpan(0, 15, 00);
            }
 
            var endpointBinding = channelFactory.Endpoint.Binding;
            endpointBinding.OpenTimeout = timeout;
            endpointBinding.CloseTimeout = timeout;
            endpointBinding.SendTimeout = timeout;
        }
    }
}
You could also create your own overloaded Load methods.
namespace ScipBe.Demo.RiaCodeGen.Framework
{
    public abstract class MyDomainContext : DomainContext
    {
        public LoadOperation Load(EntityQuery query, Action<LoadOperation> callback)
        {
            return Load(query, LoadBehavior.RefreshCurrent, callback, null);
        }
    }
}
I don't know if you ever faced the problem of logging out with RIA Services while domain contexts or still loading or submitting data. You will get exceptions. Therefore it would be handy of you could check if domain contexts somewhere in your viewmodels are still processing. In the singleton MyWebContext  class I added a 2 static methods to increase and decrease a counter and in the Load method of my MyDomainContext I call this increase method and in the callback action the counter is decreased. Of course you should do the same in the SubmitChanges and the two InvokeOperation methods.
using System;
using System.Diagnostics;
using System.ServiceModel;
using System.ServiceModel.DomainServices.Client;
 
namespace ScipBe.Demo.RiaCodeGen.Framework
{
    public abstract class MyDomainContext : DomainContext
    {
        public MyDomainContext(DomainClient domainClient) : base(domainClient)
        {
            var channelFactory = (ChannelFactory)DomainClient.GetType().GetProperty("ChannelFactory").GetValue(DomainClient, null);
 
            var timeout = new TimeSpan(0, 5, 00);
            if (Debugger.IsAttached)
            {
                timeout = new TimeSpan(0, 15, 00);
            }
 
            var endpointBinding = channelFactory.Endpoint.Binding;
            endpointBinding.OpenTimeout = timeout;
            endpointBinding.CloseTimeout = timeout;
            endpointBinding.SendTimeout = timeout;
        }
 
        public LoadOperation Load(EntityQuery query, Action<LoadOperation> callback)
        {
            return Load(query, LoadBehavior.RefreshCurrent, callback, null);
        }
 
        public override LoadOperation Load(EntityQuery query, LoadBehavior loadBehavior, Action<LoadOperation> callback, object userState)
        {
            Action<LoadOperation> newCallback =
                loadOperation =>
                    {
                        MyWebContext.DecreaseBusyCounter();
                        if (callback != null)
                        {
                            callback.Invoke(loadOperation);
                        }
                    };
 
            MyWebContext.DecreaseBusyCounter();
            return base.Load(query, loadBehavior, newCallback, userState);
        }
 
        public override SubmitOperation SubmitChanges(Action<SubmitOperation> callback, object userState)
        {
            Action<SubmitOperation> newCallback =
                submitOperation =>
                {
                    MyWebContext.DecreaseBusyCounter();
                    if (callback != null)
                    {
                        callback.Invoke(submitOperation);
                    }
                };
 
            MyWebContext.DecreaseBusyCounter();
            return base.SubmitChanges(newCallback, userState);
        }
 
        public override InvokeOperation<TValue> InvokeOperation<TValue>(string operationName, Type returnType, 
          System.Collections.Generic.IDictionary<string, object> parameters, bool hasSideEffects, 
          Action<InvokeOperation<TValue>> callback, object userState)
        {
            Action<InvokeOperation<TValue>> newCallback =
                invokeOperation =>
                {
                    MyWebContext.DecreaseBusyCounter();
                    if (callback != null)
                    {
                        callback.Invoke(invokeOperation);
                    }
                };
 
            MyWebContext.DecreaseBusyCounter();
            return base.InvokeOperation<TValue>(operationName, returnType, parameters, hasSideEffects, newCallback, userState);
        }
 
        public override InvokeOperation InvokeOperation(string operationName, Type returnType, 
          System.Collections.Generic.IDictionary<string, object> parameters, bool hasSideEffects, 
          Action<InvokeOperation> callback, object userState)
        {
            Action<InvokeOperation> newCallback =
                invokeOperation =>
                {
                    MyWebContext.DecreaseBusyCounter();
                    if (callback != null)
                    {
                        callback.Invoke(invokeOperation);
                    }
                };
 
            MyWebContext.DecreaseBusyCounter();
            return base.InvokeOperation(operationName, returnType, parameters, hasSideEffects, newCallback, userState);
        }
    }
}
using System.ServiceModel.DomainServices.Client.ApplicationServices;
 
namespace ScipBe.Demo.RiaCodeGen.Framework
{
    public class MyWebContext : WebContextBase
    {
        private static object lockObject = new object();
 
        private static int busyCounter;
 
        public static void IncreaseBusyCounter()
        {
            lock (lockObject)
            {
                busyCounter++;
            }
        }
 
        public static void DecreaseBusyCounter()
        {
            lock (lockObject)
            {
                busyCounter--;
            }
        }
 
        public bool IsBusy
        {
            get { return busyCounter > 0; }
        }
    }
}
Now you can easily check if domain contexts are busy loading or submitting data.
if (!WebContext.Current.IsBusy)
{
    WebContext.Current.Authentication.Logout();
}
I hope that you like my T4 code generation examples for RIA Services and that you can take advantage of it. It is a very powerful feature and I'm quite sure these features will be extended in future versions. If you have any other ideas, remarks or suggestions, please let me know.

Downloaden

Demo applicatie RIA Services code generatie
Inhoud Demo applicatie WCF RIA Services code generatie
Versie (2011-06-12)
Grootte 195.9 Kb


download Code