Overview
The discussion below assumes that you have a Subversion repository that uses the standard trunk/branches/tags structure. In other words, a repository at http://site.com/project with trunk, branches, and tags subdirectories.
I’ll also assume that you have already checked out a local working copy of trunk, and that you’ve already created an Eclipse project using this working copy.
When you want to work on a new branch you’ll follow these general steps using Subclipse, which are described in more detail below:
1-Create a new branch and switch to it
2-Develop in your branch, periodically merging the latest changes from trunk into your branch
3-When your development is complete, merge changes from your branch back into trunk
4-Delete your branch
Switch
Your local working copy reflects some directory in the remote Subversion repository. If you initially checkout trunk, then your working copy reflects trunk. If you initially checkout a branch, it reflects that branch. Using the svn switch command you can have Subversion modify your working copy to reflect another directory in the repository. Switching may not sound that exciting but it’s key to branching and merging, as you’ll soon see.
First off, ensure that your working copy has no local changes. Either commit your changes or revert them.
Next, right-click your project in Eclipse’s Project Explorer, select the Team submenu, and click the Switch to another Branch/Tag/Revision… item. All of Subclipse’s actions are in this Team menu, so from now on I’ll refer to specific actions like Team > Switch to another Branch/Tag/Revision.
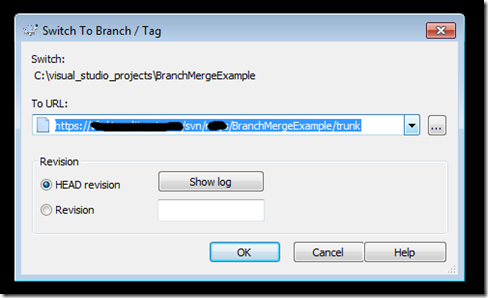
In the To URL field, you specify the URL of the repository directory you want to switch your local working copy to. If your working copy initially reflects http://site.com/project/trunk, you could specify a branch as http://site.com/project/branches/somebranch. Generally you’ll want to leave all of the other options in this dialog box as they are.
Create a new Branch
Creating a new branch is almost trivial. First, switch your local copy to trunk (if it’s not already trunk). And again, make sure you have no local changes.
Next select Team > Branch/Tag… and specify http://site.com/project/branches/yourbranch in the Copy to URL field. This will create a branch named yourbranch.
Click Next and leave HEAD revision selected. Click Next again, enter a commit message like “Created the yourbranch branch”, check the “Switch working copy to new branch/tag” checkbox, and click Finish.
That’s it! You’ve created your new branch in the repository and switched your working copy to it. Now you can implement your major new features in your branch and commit them to subversion without affecting trunk.
This is assuming you have your code checked in to the trunk directory and have a standard SVN structure of trunk, branches and tags. There are a number of developers who prefer to develop solely in a branch and never touch the trunk, but the process is generally the same and you may be on a small team and prefer to work in the trunk and branch occasionally.
There are three steps to successful branching. First you branch, then when you are ready you need to reintegrate any changes that other developers may have made to the trunk in to your branch. Then finally when your branch and the trunk are in sync, you merge it back in to the trunk.
1 -Right click project root in Windows Explorer > TortoiseSVN > Branch/Tag
2 -Enter the branch label in the ‘To URL’ box. For example /branches/1.1
3 -Choose Head revision
4-Check Switch working copy
5-Click OK
6 -Make any changes to branch
7- Make any changes to trunk
8 - Commit any changes
For this example I copied the project to another location prior to branching and made changes to that using Notepad++. Then committed it to SVN, as this directory is mapped to the trunk, that is what gets updated.
Merge Trunk into a Branch
While you’re working on your branch, you should periodically merge the latest version of trunk into your branch to make sure you’re not straying too far away. Eventually, you’ll also need to do this as the last step before merging your branch back into trunk, to ensure you won’t cause any conflicts with trunk.
First you’ll need to switch your working copy to your branch, if necessary. Subversion will merge the changes from trunk into your working copy, and then you’ll commit your working copy to your branch to fully integrate the changes from trunk. So it’s vital that you start with your working copy as a mirror of your branch. And again, ensure you have no local changes.
1- Right click project root in Windows Explorer > TortoiseSVN > Merge
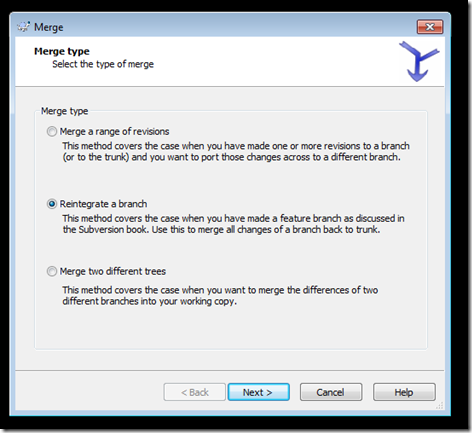
2 - Choose ‘Merge a range of revisions’
3- In ‘URL to merge from’ choose your trunk
4- Click Next, then the ‘test merge’ button. This will highlight any conflicts. Here we have one conflict we will need to resolve because we made a change and checked in to trunk earlier
5- Click merge. Now we have the opportunity to edit that conflict
6-This will open up TortoiseMerge which will allow us to resolve the issue. In this case I want both changes.
7- Perform an Update then Commit
8- Reloading in Visual Studio shows we have all changes that have been made to both trunk and branch.
Merge Branch with Trunk
When you’ve finished development in your branch, you need to merge your branch changes back into trunk, so everyone else can share in the glory of your awesome new feature. This is usually where developers turn pale and run away, but fear not; Subclipse will guide you through.
Make sure you only perform this merge when you are completely finished with your branch! After merging your branch into trunk, you will no longer be able to use your branch. In fact, you should delete your branch after merging it into trunk (see next section).
First, merge trunk into your branch and commit any changes to your branch, as described in the previous section. We need to make sure your branch is consistent with trunk before merging it back.
Next, switch your working copy to trunk. Remember that Subversion merges changes into your working copy first, and then you commit them back to the repository. So Subversion will apply your branch changes to your working copy of trunk, and then you commit those changes to trunk.
1-Switch working copy by right clicking project root in Windows Explorer > TortoiseSVN > switch
2- Switch to the trunk then ok

3- Right click project root in Windows Explorer > TortoiseSVN > merge
4- Choose ‘Reintegrate a branch’
5- In ‘From URL’ choose your branch then next
Click ‘Test merge’, this shouldn’t show any conflicts
Click Merge
Perform Update then Commit
Open project in Visual Studio, we now have all changes.
So there we have it we are connected back to the trunk and have all the updates merged.
Delete a Branch
As previously mentioned, after merging a branch into trunk, the branch can no longer be used. Subversion keeps track of merges using the svn:mergeinfo property. Because of the way it uses this property, once a branch is merged into trunk it can no longer be involved in merges properly. For the full story, please consult the last few paragraphs of this section on branching and merging.
Subclipse does not provide a way to delete an entire branch, so you’ll need to just run this command manually:
svn delete http://site.com/project/branches/yourbranch -m "Removing completed branch"


No comments :
Post a Comment