Friday 25 January 2013

Branching and Merging with TortoiseSVN || Merge Branch with Trunk || Delete a Branch ||


Overview

The discussion below assumes that you have a Subversion repository that uses the standard trunk/branches/tags structure. In other words, a repository at http://site.com/project with trunk, branches, and tags subdirectories.

I’ll also assume that you have already checked out a local working copy of trunk, and that you’ve already created an Eclipse project using this working copy.

When you want to work on a new branch you’ll follow these general steps using Subclipse, which are described in more detail below:
1-Create a new branch and switch to it
2-Develop in your branch, periodically merging the latest changes from trunk into your branch
3-When your development is complete, merge changes from your branch back into trunk
4-Delete your branch

Switch

Your local working copy reflects some directory in the remote Subversion repository. If you initially checkout trunk, then your working copy reflects trunk. If you initially checkout a branch, it reflects that branch. Using the svn switch command you can have Subversion modify your working copy to reflect another directory in the repository. Switching may not sound that exciting but it’s key to branching and merging, as you’ll soon see.

First off, ensure that your working copy has no local changes. Either commit your changes or revert them.

Next, right-click your project in Eclipse’s Project Explorer, select the Team submenu, and click the Switch to another Branch/Tag/Revision… item. All of Subclipse’s actions are in this Team menu, so from now on I’ll refer to specific actions like Team > Switch to another Branch/Tag/Revision.

In the To URL field, you specify the URL of the repository directory you want to switch your local working copy to. If your working copy initially reflects http://site.com/project/trunk, you could specify a branch as http://site.com/project/branches/somebranch. Generally you’ll want to leave all of the other options in this dialog box as they are.

Create a new Branch

Creating a new branch is almost trivial. First, switch your local copy to trunk (if it’s not already trunk). And again, make sure you have no local changes.

Next select Team > Branch/Tag… and specify http://site.com/project/branches/yourbranch in the Copy to URL field. This will create a branch named yourbranch.

Click Next and leave HEAD revision selected. Click Next again, enter a commit message like “Created the yourbranch branch”, check the “Switch working copy to new branch/tag” checkbox, and click Finish.

That’s it! You’ve created your new branch in the repository and switched your working copy to it. Now you can implement your major new features in your branch and commit them to subversion without affecting trunk.

This is assuming you have your code checked in to the trunk directory and have a standard SVN structure of trunk, branches and tags. There are a number of developers who prefer to develop solely in a branch and never touch the trunk, but the process is generally the same and you may be on a small team and prefer to work in the trunk and branch occasionally.

There are three steps to successful branching. First you branch, then when you are ready you need to reintegrate any changes that other developers may have made to the trunk in to your branch. Then finally when your branch and the trunk are in sync, you merge it back in to the trunk.


1 -Right click project root in Windows Explorer > TortoiseSVN > Branch/Tag


2 -Enter the branch label in the ‘To URL’ box. For example /branches/1.1


3 -Choose Head revision
 4-Check Switch working copy
5-Click OK
6 -Make any changes to branch


 7- Make any changes to trunk

8 - Commit any changes


For this example I copied the project to another location prior to branching and made changes to that using Notepad++. Then committed it to SVN, as this directory is mapped to the trunk, that is what gets updated.


Merge Trunk into a Branch

While you’re working on your branch, you should periodically merge the latest version of trunk into your branch to make sure you’re not straying too far away.  Eventually, you’ll also need to do this as the last step before merging your branch back into trunk, to ensure you won’t cause any conflicts with trunk.

First you’ll need to switch your working copy to your branch, if necessary.  Subversion will merge the changes from trunk into your working copy, and then you’ll commit your working copy to your branch to fully integrate the changes from trunk.  So it’s vital that you start with your working copy as a mirror of your branch.  And again, ensure you have no local changes.


1- Right click project root in Windows Explorer > TortoiseSVN > Merge


2 - Choose ‘Merge a range of revisions’


3- In ‘URL to merge from’ choose your trunk


4- Click Next, then the ‘test merge’ button. This will highlight any conflicts. Here we have one conflict we will need to resolve because we made a change and checked in to trunk earlier


5- Click merge. Now we have the opportunity to edit that conflict


6-This will open up TortoiseMerge which will allow us to resolve the issue. In this case I want both changes.


7- Perform an Update then Commit


8- Reloading in Visual Studio shows we have all changes that have been made to both trunk and branch.


Merge Branch with Trunk


When you’ve finished development in your branch, you need to merge your branch changes back into trunk, so everyone else can share in the glory of your awesome new feature.  This is usually where developers turn pale and run away, but fear not; Subclipse will guide you through.

Make sure you only perform this merge when you are completely finished with your branch!  After merging your branch into trunk, you will no longer be able to use your branch.  In fact, you should delete your branch after merging it into trunk (see next section).

First, merge trunk into your branch and commit any changes to your branch, as described in the previous section.  We need to make sure your branch is consistent with trunk before merging it back.

Next, switch your working copy to trunk.  Remember that Subversion merges changes into your working copy first, and then you commit them back to the repository.  So Subversion will apply your branch changes to your working copy of trunk, and then you commit those changes to trunk.

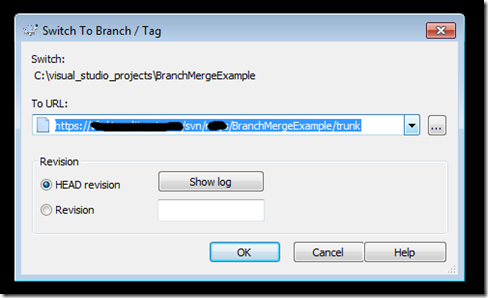
1-Switch working copy by right clicking project root in Windows Explorer > TortoiseSVN > switch


2- Switch to the trunk then ok


3- Right click project root in Windows Explorer > TortoiseSVN > merge


4- Choose ‘Reintegrate a branch’


5- In ‘From URL’ choose your branch then next


Click ‘Test merge’, this shouldn’t show any conflicts


Click Merge
Perform Update then Commit


Open project in Visual Studio, we now have all changes.

So there we have it we are connected back to the trunk and have all the updates merged.


Delete a Branch

As previously mentioned, after merging a branch into trunk, the branch can no longer be used.  Subversion keeps track of merges using the svn:mergeinfo property.  Because of the way it uses this property, once a branch is merged into trunk it can no longer be involved in merges properly.  For the full story, please consult the last few paragraphs of this section on branching and merging.

Subclipse does not provide a way to delete an entire branch, so you’ll need to just run this command manually:

svn delete http://site.com/project/branches/yourbranch -m "Removing completed branch"

Thursday 24 January 2013

Tuesday 15 January 2013

SQL Server Optimization Tips

In this article we discuss about how to optimize the SQL Server with simple tips.


Use views and stored procedures instead of heavy-duty queries.
This can reduce network traffic, because your client will send to server only stored procedure or view name (perhaps with some parameters) instead of large heavy-duty queries text. This can be used to facilitate permission management also, because you can restrict user access to table columns they should not see.


Try to use constraints instead of triggers, whenever possible.
Constraints are much more efficient than triggers and can boost performance. So, you should use constraints instead of triggers, whenever possible.


Use table variables instead of temporary tables.
Table variables require less locking and logging resources than temporary tables, so table variables should be used whenever possible. The table variables are available in SQL Server 2000 only.


Try to use UNION ALL statement instead of UNION, whenever possible.
The UNION ALL statement is much faster than UNION, because UNION ALL statement does not look for duplicate rows, and UNION statement does look for duplicate rows, whether or not they exist.


Try to avoid using the DISTINCT clause, whenever possible.
Because using the DISTINCT clause will result in some performance degradation, you should use this clause only when it is necessary.


Try to avoid using SQL Server cursors, whenever possible.
SQL Server cursors can result in some performance degradation in comparison with select statements. Try to use correlated sub-query or derived tables, if you need to perform row-by-row operations.


Try to avoid the HAVING clause, whenever possible.
The HAVING clause is used to restrict the result set returned by the GROUP BY clause. When you use GROUP BY with the HAVING clause, the GROUP BY clause divides the rows into sets of grouped rows and aggregates their values, and then the HAVING clause eliminates undesired aggregated groups. In many cases, you can write your select statement so, that it will contain only WHERE and GROUP BY clauses without HAVING clause. This can improve the performance of your query.


If you need to return the total table's row count, you can use alternative way instead of SELECT COUNT(*) statement.
Because SELECT COUNT(*) statement make a full table scan to return the total table's row count, it can take very many time for the large table. There is another way to determine the total row count in a table. You can use sysindexes system table, in this case. There is ROWS column in the sysindexes table. This column contains the total row count for each table in your database. So, you can use the following select statement instead of SELECT COUNT(*): SELECT rows FROM sysindexes WHERE id = OBJECT_ID('table_name') AND indid < 2 So, you can improve the speed of such queries in several times.


Include SET NOCOUNT ON statement into your stored procedures to stop the message indicating the number of rows affected by a T-SQL statement.
This can reduce network traffic, because your client will not receive the message indicating the number of rows affected by a T-SQL statement.


Try to restrict the queries result set by using the WHERE clause.
This can results in good performance benefits, because SQL Server will return to client only particular rows, not all rows from the table(s). This can reduce network traffic and boost the overall performance of the query.


Use the select statements with TOP keyword or the SET ROWCOUNT statement, if you need to return only the first n rows.
This can improve performance of your queries, because the smaller result set will be returned. This can also reduce the traffic between the server and the clients.


Try to restrict the queries result set by returning only the particular columns from the table, not all table's columns.
This can results in good performance benefits, because SQL Server will return to client only particular columns, not all table's columns. This can reduce network traffic and boost the overall performance of the query.


Summary for SQL Server Optimizations


Use Indexes
avoid more number of triggers on the table
avoid unnecessary complicated joins
correct use of Group by clause with the select list
Do Denormalization if required

how to make image bright and how to change text color dynamically

There are some situations where you need to change the content display dynamically. Like, you have to change font color and background color of your text or you have to make image bright. You can do these things by applying styles dynamically through javascript.


Here I gave you a solution to fulfill such type of requirement by using jQuery functions. We are using jQuery mouseover() function to highlight text or image on your webpage whenever we place mouse on it.


Below is the code to make text or image highlight whenever we place mouse on it.


<html>
<head>
<title>highlight the text and image dynamically using jQuery</title>
<script type="text/javascript" src="jquery.js"></script>
<script type="text/javascript">
$(document).ready(function() {
$('#parent').mouseover(function() {
$('#child1').css({
'background-color': 'green',
'font-weight': 'bold',
'color': 'red'
});
$('#child2').css({
'background-color': 'cyan',
'font-weight': 'bold',
'color': 'blue'
});

$('#img1').css({
'opacity':1.0
});
});

$('#parent').mouseout(function() {
$('#child1').css({
'background-color': 'white',
'font-weight': 'normal',
'color': 'black'
});

$('#child2').css({
'background-color': 'white',
'font-weight': 'normal',
'color': 'black'
});

$('#img1').css({
'opacity': 0.4
});
});

});
</script>
</head>
<body>
<div id="parent">
<div id="child1">this text from first child</div>
<div id="child2">this text from second child</div>
<img src="img1.jpg" id="img1" style="opacity:0.4" />
</div>
</body>
</html>


Here we have two <div> tags whose id's are child1, child2 and one <img> tag whose id is img1 with in parent <div> tag whose id is "parent".


We are applying jQuery mouseover() function to the parent <div> tag by using $('#parent').mouseover(function() { }. Within this function we are applying our required properties to different elements.


$('#child1').css({
'background-color': 'green',
'font-weight': 'bold',
'color': 'red'
});
$('#child2').css({
'background-color': 'cyan',
'font-weight': 'bold',
'color': 'blue'
});


will change the font color and background color of our two <div> tags to our required colors whenever we place mouse on it.


$('#img1').css({
'opacity':1.0
});


will make the image bright whenever we place the mouse on it.


Here we are also using the jQuery mouseout() function to roll back the changes of our elements.


$('#parent').mouseout(function() {
$('#child1').css({
'background-color': 'white',
'font-weight': 'normal',
'color': 'black'
});

$('#child2').css({
'background-color': 'white',
'font-weight': 'normal',
'color': 'black'
});

$('#img1').css({
'opacity': 0.4
});
});


will change the text font color, background color to black, white and will make the image blurred whenever mouse out from the content.

Apply CSS styles using jQuery

Here I am explaing how to apply CSS styles using jQuery. It is simple to apply styles using jQuery.


<html>
<head>
<title>This is jquery example for applying bold and italic for given elements</title>
<script type="text/javascript" src="jquery.js"></script>
<script type="text/javascript">
$(document).ready(function() {
$('p').addClass('boldtext');
$('#pid').addClass('italictext');
});
</script>
<style type="text/css">
.boldtext
{
font-weight:bold;
}
.italictext
{
font-style:italic;
}
</style>
</head>
<body>
<p>This is jquery example to make text as bold by applying class name to 'p' element itself</p>
<p id="pid">
This is jquery example to make text as italic by applying class name to 'p' id
</p>
</body>
</html>


In the above code we have two <p> tags. We make the these <p> tags text bold and italic bys using jQuery as given below.


$('p').addClass('boldtext');

$('#pid').addClass('italictext');


In the first line we make the all <p> tags text bold by applying "boldtext" CSS class to $('p'). $('p') means we are accessing all <p> tags.


In the second line we make the HTML tag texts whose id is "pid" as italic by applying "italictext" CSS class to $('#pid'). $('#pid') means we are accesing the HTML tags whose id is "pid".


Place all above HTML code in a HTML file and open it in any browser. You can find that all text in bold and only second line is in italic because we did all <p> tags text in bold by using $('p').addClass('boldtext') and we apply the italic style to second <p> tag only by using $('#pid').addClass('italictext').


Some times you have to apply different styles to alternative elements. For example, if you have some div tags and you need to apply different styles to alternative elements. For this type of requirement jQuery provides good solution as shown below.


<html>
<head>
<title>This is jquery example for applying the styles for alternative elements</title>
<script type="text/javascript" src="jquery.js"></script>
<script type="text/javascript">
$(document).ready(function() {
$('div:odd').addClass('boldtext');
$('div:even').addClass('italictext');
$('p:eq(2)').addClass('italicbold');
});
</script>
<style type="text/css">
.boldtext
{
font-weight:bold;
}
.italictext
{
font-style:italic;
}
.italicbold
{
font-weight:bold;
font-weight:bold;
}
</style>
</head>
<body>
<div>This is jquery example to make odd div tags bold and even div tags italic by applying two class names to 'div' element itself</div>

<p>This is jquery example to make 3rd 'p' tag text as bold and italic</p>

</body>

</html>


As shown above, we apply the different styles for alternative div tags by using below jQuery code.


$('div:odd').addClass('boldtext');
$('div:even').addClass('italictext');


$('div:odd').addClass('boldtext') means "boldtext" CSS class added to odd number div tags.

$('div:even').addClass('italictext') means "italictext" CSS class added to even number div tags.


The above HTML code also includes one more functionality. That is $('p:eq(2)').addClass('italicbold'). $('p:eq(2)') represents the 3rd <p> tag element of all <p> tags in the HTML code. "eq" is the jQuery function, it will take index of the elements. In jQuery index starts from 0. Here we are making 3rd <p> tag text as italic and bold by applying "italicbold" CSS class to it.

Thursday 10 January 2013

How to find the right balance in between functionality and technology

The fundamental goal of each software developer is to build and deliver the right software that satisfies their customers. A software developer that wants to succeed, must be a professional focusing on a positive outcome of the project. He needs to find the right balance between building the right software and building the software right.
“There is only one boss. The customer. And he can fire everybody in the company from the chairman on down, simply by spending his money somewhere else” – Sam Walton


Focus on result

We need to understand that our customers’ problems are our challenges. We need to make sure that we addresses our customer’s needs. More importantly, we need to be able to respond and adapt quickly to changing situations, “whether it’s a wave  or a design that breaks sooner than expected”. This is how it works and we need to get used to it. We need to change the way we treat our customers, because development has to be a partnership between the customer and the development team.
Not to lose focus, we always need to make a valuable judgment about what is really important. We shouldn’t make all the decisions about a project ourselves, just because we know the most about the application. Let customers decide, especially when it is critical to their business.

Code quality isn’t the highest aim

Realizing good code quality and using best practice coding techniques to build the software right are important components of a successful project. But we should not forget that the cleanest code and the best architecture are not sufficient to build a successful solution which will be accepted by the client.
Developers tend to apply the best practices and/or design patterns to their projects. However,  in many cases we do this without considering whether this is actually needed. By applying patterns and best practices we tend to forget why they were created and when we should apply them in the first place. As a result they become anti-patterns that ultimately produce more bad consequences than beneficial results and isn’t that what we usually try to avoid?

Simplicity before beloved complexity

Simplicity is the key. We tend to over complicate simple problems and build complex solutions where it’s not needed. Most programs work best when kept simple. And simplicity is not only about the code; it is also about the design and architecture. Following the “Keep it simple, Stupid!” principle, we will end up with more efficient and high quality software.
We are obsessed by the need to use the latest technology, just because it is new. We shouldn’t make design decisions based on our own technology excitement. We should think whether the technology or application framework really solves the problem. A blindly chosen solution may have a negative impact on the project. We need to realize this each time when we are tempted by the newest technology or an application framework.

Striving for excellence

One of the key concepts of a successful software developer is striving for excellence. Software developers have to continuously improve their development process, skills and knowledge. The successful software developer learns not only coding techniques or technology but he also learns how to understand the (changing) customer business’ needs. He gains the ability to make proper decisions and find the right balance between functionality and technology.

Top 4 qualities of a good software developer

Have you ever wondered whether you can consider yourself a good software developer? If so, you probably also wondered what it means to be a good software programmer. What are the skills of a good software engineer? What are the differences between the bad and the good one? Is this just a matter of experience? Is this connected with knowledge and practice or rather with some inborn abilities? How to become a good software developer? Let me share with you my definition of a good programmer.

1. Analytical mind

There is no strict definition of an analytical mind. One thing is for sure: if you have an analytical mind you are able to think, observe data, remember and basing on these activities, resolve problems.

Unfortunately, this is the most crucial and needed skill of a good software developer. Why “unfortunately”? Well this means that not everybody can become a good software developer, even if they really struggle. Having analytical mind is to a big extend an inborn ability. If you do not possess this skill it is better to change the field of interest.

Solving many algorithmic and logic problems can increase the basic level of analytical thinking ability. However, every person has their own border (“maximum level” – like in RPG games) which can’t be exceeded.

2. Big-picture perception of a software

Creating software is like playing chess – to win you need to predict a few moves ahead. You should not only look at the presence but also into the future while programming. To be a good software developer you can’t only be focused on a small piece of software that you are implementing. You don’t only need to know how to implement something, but also why. You need to see the software as a whole not just as the small part you are currently working on. You need to understand the impact of your small piece on the whole. All in all, you simply need to see the bigger picture.

3. Business oriented approach to software development

In my definition of a good software developer, it is not enough to be technically oriented. You can be a good coder and your code can be of a really high quality, but still you won’t manage to understand and satisfy your customers’ needs. If you are not business oriented, it can potentially cause a lot of problems: misunderstandings, usability lacks or late changes in the functionality.

So, what does it mean to be a business oriented software developer? There are many factors that influence this feature of a developer, but in my opinion the most relevant are the below ones:
Understanding software from a business perspective
Appreciation of client’s needs
The ability of converting business problems into technical solutions
The ability to cooperate and understand people from non-technical stuff

4. Teamwork eagerness

A good software developer is not a person who sits for the whole day in front of the computer and codes. If a project is supposed to be successful, the communication inside the team is crucial. Exchanging thoughts, ideas, knowledge and experience can boost the efficiency and the quality of the solution. A developer who is not eager or able to communicate with other team members will not be able to fit in the team and in the process of developing software. I am aware that there are many very introverted developers who are doing really a great job and produce high-quality code. Yet in Agile, which is more and more common amongst IT companies, pure coding is not enough. Communication inside a team is one of the major keys to success.
Agile World needs good programmers

The above definition of a good software developer wouldn’t be applicable several years ago. If we weren’t agile, probably any good coder could be considered a good developer. But we are. Nowadays the IT world needs good Agile software developers who are able to analyze problems, see them from a broader perspective, are business oriented and eager to work in teams. Without them IT projects could not be handled by means of Agile methodology. Agile manifesto would become just a set of insignificant principals, not used by anyone.

What is your opinion on this subject? Do you think there are more abilities and skills that are required to be a good software developer? Is your definition of a good programmer different from the one displayed above? Feel free to share your own opinion below.